Construction defect caulking failures are defined as sealant breakdowns at building envelope joints that allow water, air, or moisture to penetrate the structure. These failures are among the most common construction caulking issues documented in residential and commercial properties across Ontario, and they range from cracked window perimeters to obstructed weep holes in storefront systems. What makes them particularly costly is that the damage they cause, including rot, mould, and structural degradation, often develops well before anyone notices the sealant has failed. Understanding real construction defect caulking related examples helps you spot problems early, document them correctly, and make repair decisions that actually last.
1. Common construction defect caulking related examples at window and door perimeters
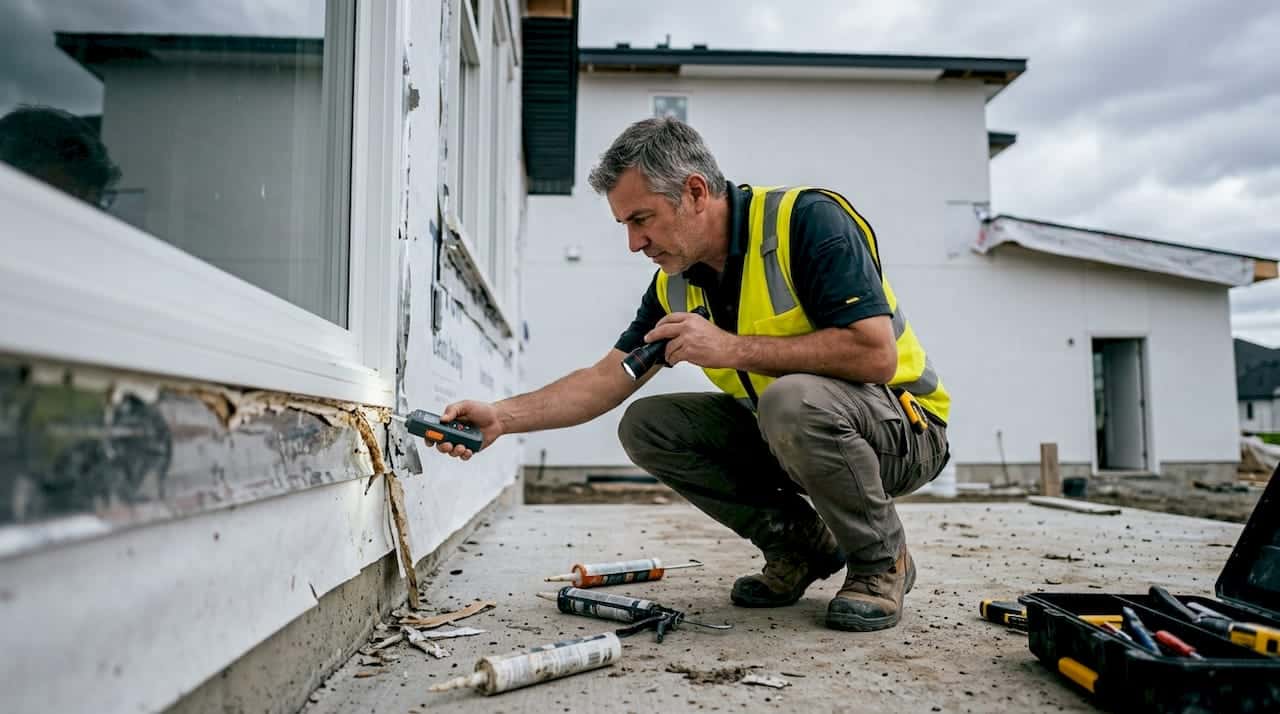
Window and door perimeter joints are the most frequently cited location for caulking failure examples in residential construction. These joints must accommodate thermal movement, wind pressure, and seasonal moisture changes. When the sealant type is wrong, the joint is too shallow, or the surface was not properly primed before application, the seal breaks down faster than it should.
Common signs of perimeter joint failure include:
- Caulk pulling away from the frame or masonry on one or both sides
- Visible cracking along the length of the joint, often in a straight line
- Water stains on interior walls or window sills after rain
- Soft or discoloured drywall near window corners
- Bubbling or peeling paint directly above or below the joint
Sealant failures largely trace back to joint geometry and adhesion issues rather than the sealant material itself. That means even a quality product will fail if the joint is too narrow, too deep, or applied to a dusty or damp surface.
One caulking failure example that comes up repeatedly is cosmetic re-caulking over failed flashing. A builder or homeowner applies a fresh bead of caulk over a cracked joint without removing the old material or addressing the flashing behind it. The new sealant bonds to the old layer rather than the substrate, and the joint fails again within one or two seasons. Polyurethane sealant is the standard choice for painted window perimeters due to its toughness, but it degrades under direct UV exposure without a protective coating. Silicone handles UV better but cannot be painted, so product selection must match the specific exposure conditions.

Pro Tip: Before applying any new caulk at a window perimeter, remove all old sealant down to the substrate, clean the surface with isopropyl alcohol, and allow it to dry fully. Skipping this step is the single most common reason re-caulking jobs fail within a year.
2. EIFS and penetration caulking failures
Exterior Insulation and Finish Systems, commonly called EIFS or synthetic stucco, depend on a layered approach to water management. Caulk is only the outer waterproofing layer in these assemblies. When flashing, backer rods, and correct joint geometry are absent, the sealant carries the full load of water management and fails under that pressure.
The most common EIFS caulking defects at penetrations follow a predictable pattern:
- A hose bib, electrical box, or vent is installed through the EIFS wall without proper flashing or back-dam detail.
- The installer applies caulk around the penetration perimeter as the only seal.
- The caulk joint lacks a backer rod, creating three-sided adhesion that prevents the sealant from stretching and compressing with movement.
- Cohesive failure occurs, meaning the sealant tears internally rather than flexing, and water enters the wall cavity.
- Because the failure is hidden behind the EIFS finish, water damage to sheathing and framing accumulates undetected.
The comparison below shows the difference between a correctly detailed EIFS penetration and a common defective installation:
| Detail | Correct installation | Common defect |
|---|---|---|
| Flashing | Integrated back-dam flashing at penetration | No flashing, caulk only |
| Backer rod | Sized 25% larger than joint width | Absent or wrong size |
| Joint geometry | Controlled width-to-depth ratio, two-sided adhesion | Random depth, three-sided adhesion |
| Sealant bond | Bonds to substrate on two sides only | Bonds to substrate and back of joint |
| Failure mode | Flexible, long-lasting seal | Cohesive tearing within 1 to 3 seasons |
ASTM C1193 specifies minimum joint sizes and recommends backer rods sized about 25% larger than the joint width to prevent three-sided adhesion. This standard exists precisely because three-sided adhesion is one of the most predictable causes of sealant failure in building envelopes.
Adding new caulk over old failed caulk rarely works because the new sealant bonds to the degraded layer rather than the original substrate. In EIFS systems, this is a particularly common cause of short repair lifespans.
Pro Tip: When inspecting EIFS walls for caulking problems, press gently along the sealant bead at each penetration. Any sealant that moves independently of the substrate or feels hollow underneath has likely lost adhesion and needs full removal before re-sealing.
3. Storefront, curtain-wall, and glazing system sealing failures
Commercial glazing systems produce some of the least obvious construction sealing failures, and they tend to cause the most expensive damage. The failure mechanism is not always visible from the outside, which is why these defects are frequently missed during standard inspections.
The core problem in thermally broken aluminium storefront systems is weep hole obstruction. Weep holes are small openings at the sill of the frame designed to drain any water that enters the glazing pocket. When sealant is applied at the sill end dams without verifying that these holes remain clear, water becomes trapped inside the frame. Trapped water at the sill is the primary cause of frame corrosion and thermal break bond line failure in these systems.
Signs that weep hole obstruction may be present include:
- Water stains or mineral deposits at the base of storefront frames
- Visible corrosion or white oxidation on aluminium sill members
- Soft or deteriorating thermal break material visible at frame cross-sections
- Sealant beads at sill end dams that appear overfilled or applied without precision
A special inspection costing under two hours per floor can identify this failure mode before it causes corrosion. That is a straightforward investment compared to the cost of replacing corroded frame sections or addressing water damage to flooring and interior finishes below the sill.
The practical lesson for property managers overseeing commercial construction or renovation is to verify weep hole placement and clearance at the sill before sealant is applied at end dams. Once the sealant is in place and the system is glazed, accessing those weep holes for inspection becomes significantly more difficult.
4. How cosmetic caulking repairs undermine construction defect claims
Cosmetic repairs like caulking over leaks destroy evidence that is needed for successful construction defect claims. This is one of the most consequential and least discussed aspects of common inspection failures related to caulking. When you patch a joint, paint over a stain, or apply fresh sealant before documenting the original condition, you remove the physical evidence that supports your claim.
Patching or caulking over faulty flashing hides the root cause and weakens or invalidates claims. This applies to both individual homeowners and HOAs managing multi-unit properties. The legal concept involved is spoliation of evidence, which refers to the destruction or alteration of material that is relevant to a legal proceeding.
Attorney Matthew Bagdasar advises that documenting defect conditions before any repairs is the single most important step to preserve insurance and legal options. The recommended documentation process includes:
- Wide-angle and close-up photographs of every affected area, with timestamps
- Video walkthroughs that capture the extent and location of damage
- A written log with dates, weather conditions, and descriptions of observed symptoms
- A dedicated cloud folder to store all evidence in one organised location
- Weekly tracking of any changes or progression in the damage
Unverified cosmetic fixes like sealant application without inspection can also exacerbate water intrusion by sealing moisture inside wall cavities. Beyond the legal risk, you may be making the underlying problem worse. A professional caulking deficiencies walkthrough before any repair work gives you a clear picture of what you are dealing with and protects your options.
“Document everything before you touch anything. Once you start patching, you change the story the building is telling.”
Key takeaways
Caulking failures are almost always caused by incorrect joint design, missing backer rods, or poor surface preparation rather than the sealant product itself.
| Point | Details |
|---|---|
| Joint design drives failure | Missing backer rods and three-sided adhesion cause cohesive tearing, not just product degradation. |
| EIFS needs more than caulk | Flashing and correct joint geometry are required; caulk alone cannot manage water in these systems. |
| Weep holes must stay clear | Sealant misapplication at storefront sill end dams traps water and causes frame corrosion. |
| Document before you repair | Caulking over defects without documentation can destroy evidence and void warranty claims. |
| Re-caulking over old sealant fails | New sealant bonds to the old layer, not the substrate, causing the same failure to repeat. |
What 25 years on the job has taught me about caulking failures
I have seen the same mistakes repeat themselves on job sites across the Greater Toronto Area for decades. The most frustrating ones are not the complex technical failures. They are the simple ones: a bead of caulk applied over a joint that was never cleaned, a backer rod that was skipped because it added ten minutes to the job, or a homeowner who re-caulked a window three times without ever removing the old material.
Ontario’s freeze-thaw cycles are genuinely punishing on sealant joints. A joint that is slightly too shallow or bonded on three sides will fail within one or two winters here. That is not a product problem. It is a preparation and design problem. The sealant cannot do its job if the joint geometry is wrong.
What I tell every property manager and homeowner I work with is this: the cost of doing it right the first time is always less than the cost of fixing it twice. That means proper removal of old sealant, correct backer rod sizing, surface priming where required, and product selection matched to the specific exposure. If you are unsure about common window caulking mistakes before starting a repair, read up first. A professional inspection before remediation is worth every dollar, especially when there is any possibility of a warranty or legal claim involved.
— Felix
Get lasting results with Kettlecontracting
If you have identified caulking defects on your property or want to prevent them before they cause damage, Kettlecontracting is ready to help. We serve residential and commercial properties across the Greater Toronto Area with professional-grade sealing solutions built for Ontario’s climate.

Start with the right preparation. Our window caulking preparation guide walks you through every step needed before a single bead of sealant is applied, from surface cleaning to product selection. For existing failures, our team provides thorough assessment and repair that addresses root causes rather than symptoms. When you work with Kettlecontracting, you get honest advice, clear pricing, and work that holds up through every season. Reach out today to book a site assessment.
FAQ
What are the most common caulking defects in residential buildings?
The most common caulking defects are cracking or pulling away at window and door perimeters, failed sealant at EIFS penetrations due to missing backer rods, and re-caulking over old failed sealant without removing the original material. All three failures typically trace back to poor joint preparation or incorrect joint design rather than the sealant product itself.
Why does new caulk fail so quickly after re-application?
New caulk applied over old failed sealant bonds to the degraded layer rather than the original substrate, which means the adhesion is weak from the start. Full removal of the old sealant and proper surface preparation are required for any repair to last.
Can caulking over a leak make a construction defect claim harder to pursue?
Yes. Caulking over leaks before documenting the defect can constitute spoliation of evidence, weakening or invalidating a legal claim. Always photograph and record the original condition before making any repairs.
What is three-sided adhesion and why does it cause sealant failure?
Three-sided adhesion occurs when sealant bonds to the back of a joint as well as both sides, preventing it from stretching and compressing with building movement. This stress concentration causes the sealant to tear internally, a condition known as cohesive failure, rather than flexing as intended.
How do I know if weep holes in my storefront system are blocked?
Visible water stains, mineral deposits, or corrosion at the base of aluminium storefront frames are the most reliable indicators of blocked weep holes. A qualified inspector can verify weep hole clearance during a site walkthrough, ideally before sealant is applied at sill end dams.