An exterior wall caulking schedule is a planned programme of regular inspections and sealant reapplication designed to keep your building’s envelope sealed against water, air, and the kind of damage that quietly adds up over years. In Ontario, where freeze-thaw cycles can crack and compress sealant every single winter, having a clear schedule is not optional. It is the difference between a dry, energy-efficient home and one with water stains on the drywall by spring. This guide explains what a proper exterior caulking schedule looks like, when to inspect, when to replace, and how the approach differs between residential and commercial properties.
What is an exterior wall caulking schedule?
An exterior wall caulking schedule is a documented maintenance plan that sets out when to inspect sealant joints and when to reapply or replace them. The industry term used by building envelope professionals is a sealant maintenance programme, and it covers all points where two different materials meet on your exterior wall: window frames, door frames, expansion joints, corners, and penetrations like pipes or vents.
The core structure of any schedule has two parts. First, annual visual inspections to catch early signs of failure. Second, a replacement cycle of every 5–10 years depending on climate, product quality, and exposure. Those two intervals work together. The inspection tells you whether the replacement cycle needs to move sooner.
Key areas that belong on every exterior caulking schedule include:
- Window and door perimeters
- Corners where cladding panels meet
- Expansion and control joints
- Penetrations for pipes, vents, and electrical conduit
- Sill plates and foundation transitions
Understanding the role of caulk on your home exterior helps clarify why each of these locations matters. Missing even one can allow water to track behind the cladding and cause damage that is far more expensive than a tube of sealant.
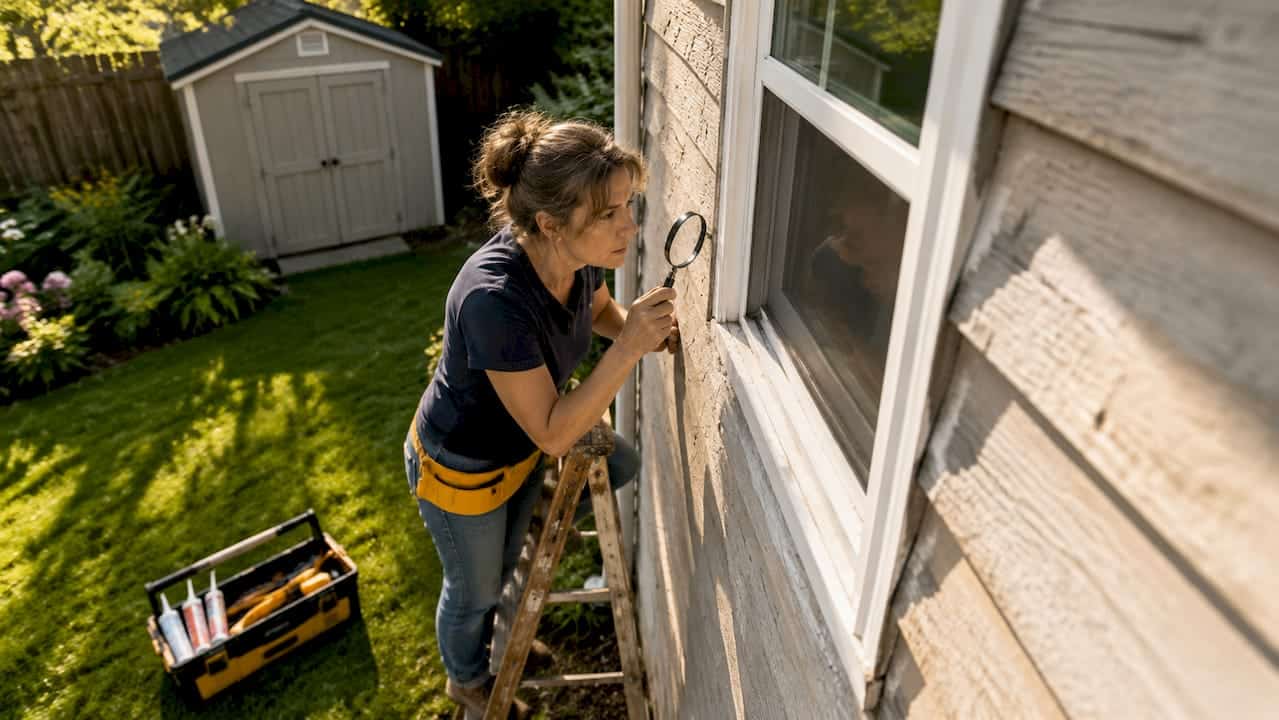
How often should exterior walls be inspected for caulking condition?
Annual inspection is the standard for residential exterior walls. That frequency gives you a reliable window to catch deterioration before it becomes structural damage. The best time to inspect in Ontario is early spring, right after the last freeze, when any winter damage is fresh and visible.
What you are looking for during an inspection:
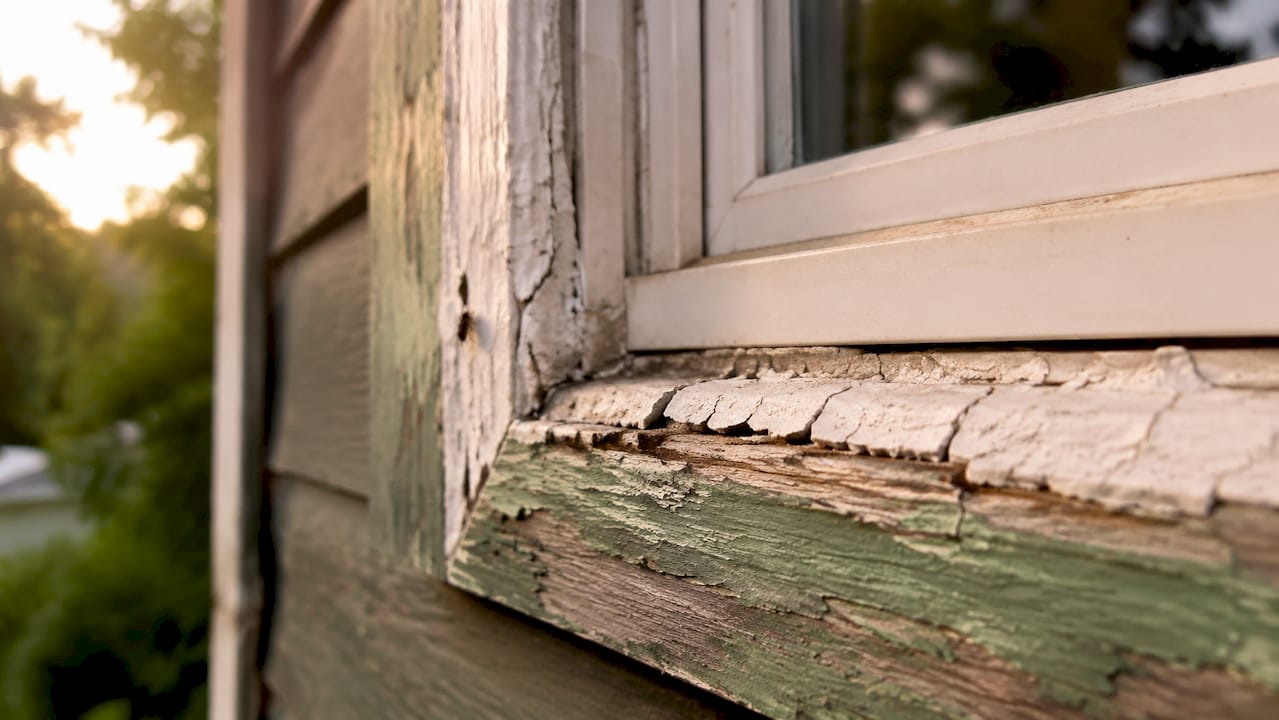
- Cracks or splits running along the length of a bead
- Shrinkage where the caulk has pulled away from one or both surfaces
- Peeling or lifting at the edges
- Gaps at corners or transitions between materials
- Discolouration or mould growth on or around the sealant
Each of these signs points to a different failure mode, but all of them mean the seal is compromised. A gap at a window corner, for example, can let in enough water to rot the rough framing behind the cladding within two or three seasons.
Pro Tip: Keep a simple inspection log with photos taken from the same angles each year. This makes it easy to spot gradual changes that you might miss in a single visit, and it gives a contractor a clear picture of how quickly the sealant is degrading.
Annual inspection is not the same as annual replacement. Replacement depends on observed performance rather than the calendar alone. Many homes only need localized spot repairs in a given year, which keeps costs manageable and avoids unnecessary disruption. Your window caulking maintenance checklist should reflect what you actually find, not a fixed assumption that everything needs replacing.
How long does exterior caulk last before it needs replacing?
Exterior caulk typically lasts 5–10 years, but that range is wide for a reason. A silicone sealant on a sheltered north-facing wall in a mild climate will outlast an acrylic caulk on a south-facing wall that gets full sun and Ontario winters. Product quality, surface preparation, and application conditions all affect where your caulk lands in that range.
Here is how to think about replacement decisions in practice:
- Spot repair first. If only one or two joints show cracking or shrinkage, remove the failed section and reapply. There is no need to strip the entire perimeter.
- Full reapplication at the 7–10 year mark. Even caulk that looks intact can lose flexibility and adhesion over time. At this point, a full perimeter reapplication is the right call.
- Accelerated replacement after harsh winters. Ontario’s freeze-thaw cycles compress and expand sealant repeatedly. If you had an unusually cold or wet winter, inspect earlier and replace sooner.
- Product upgrade on replacement. When you do replace, move to an outdoor-grade silicone or hybrid sealant if you are not already using one. These products handle UV exposure and temperature swings far better than standard acrylic formulations.
- Document the replacement date. Write it down. Most homeowners cannot remember when caulking was last done, which makes scheduling the next cycle impossible.
Delaying replacement has real consequences. Water intrusion behind cladding leads to mould, rot, and insulation damage. Air leakage through failed joints raises heating costs every winter. The cost of a full recaulking job is a fraction of what water damage remediation runs.
What weather conditions are best for applying exterior caulk?
The U.S. Department of Energy recommends applying exterior caulk in dry weather with outdoor temperatures above 45°F (7.2°C) and low humidity. These conditions matter because caulk needs to adhere to a clean, dry surface and cure without interference from moisture or cold.
In Ontario, that practical window falls in two periods: late april through early june, and late august through october. Both windows give you temperatures above the threshold and lower humidity than the peak of summer. Mid-summer heat is not ideal either. Extreme heat causes some sealants to skin over too quickly, which traps uncured material underneath and leads to premature cracking.
“Applying exterior caulk during the seasonal window when temperatures exceed 45°F in dry weather improves adhesion and long-term durability.” — U.S. Department of Energy
Low humidity is particularly important for surfaces like masonry and concrete. These materials absorb moisture from the air, and if the substrate is damp when you apply caulk, the bond will fail at the surface interface rather than holding through the joint. That is a failure you will not see until the following spring.
Pro Tip: Check the forecast for at least 24 hours after application, not just on the day of the job. Rain hitting uncured caulk can wash out the surface and leave a weak bond. A dry 48-hour window is the target.
For more detail on timing exterior caulk application by season, the differences between spring and fall windows are worth understanding before you book any work.
How do commercial and residential caulking schedules compare?
The core principle is the same for both property types: inspect annually, replace based on condition. The difference is in the structure, the documentation requirements, and the consequences of getting it wrong.
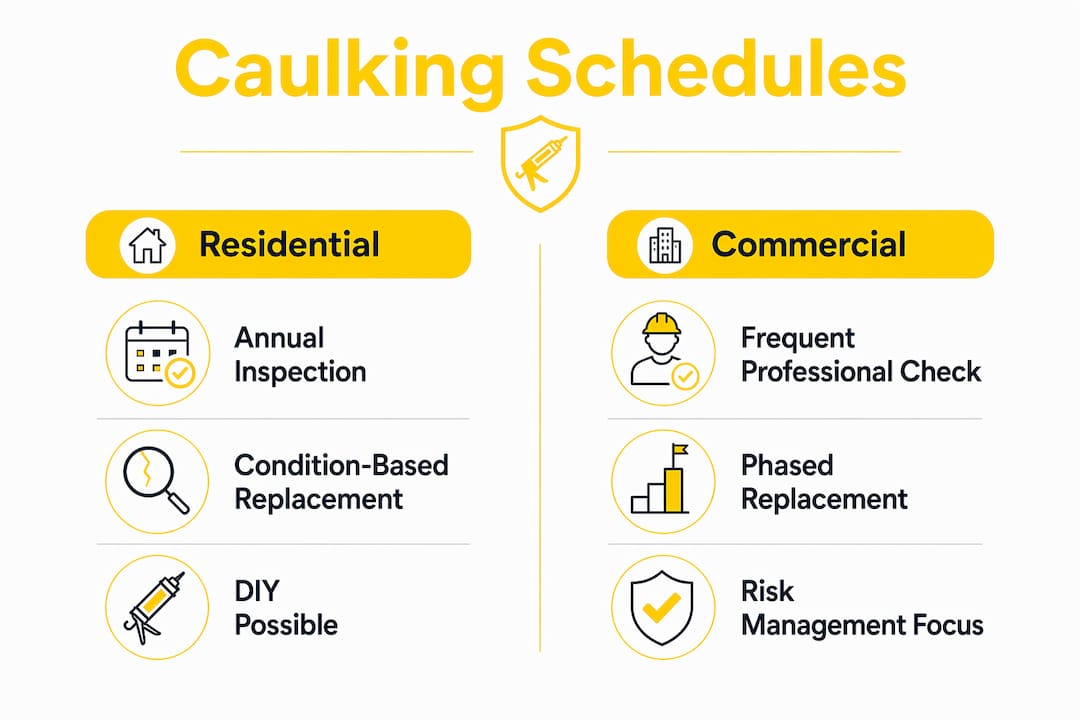
| Factor | Residential | Commercial / Multi-Unit |
|---|---|---|
| Inspection frequency | Annual visual check | Annual visual check, professional inspection every 3–5 years |
| Replacement cycle | Every 5–10 years | Full perimeter reapplication every 3–5 years |
| Adhesion testing | Not typically required | ASTM C1521 testing every 5 years for structural sealants |
| Planning approach | Reactive with spot repairs | Phased reserve planning |
| Documentation | Informal log | Formal maintenance records |
For HOA boards and condo corporations managing EIFS or multi-unit buildings, the standard approach is a phased sealant reserve plan. This means annual spring inspections to catch freeze-thaw damage, professional assessments every 3–5 years, and major recoats budgeted for the 10–15 year mark. That structure lets property managers plan capital expenditures rather than respond to emergencies.
Building envelope professionals treat sealant maintenance as a risk management task, not a cosmetic one. For commercial properties, a failed joint at a curtain wall or expansion joint can mean water intrusion across multiple floors. The cost of that repair dwarfs the cost of a scheduled reapplication. For guidance on planning caulking for commercial retrofits, the scheduling framework is more involved but follows the same logic: inspect, assess, repair in order of priority.
Key takeaways
A proper exterior wall caulking schedule combines annual inspections with condition-based replacement every 5–10 years, adjusted for Ontario’s climate and the specific demands of your property type.
| Point | Details |
|---|---|
| Annual inspection is non-negotiable | Inspect every spring to catch freeze-thaw damage before it worsens through summer. |
| Replacement cycle is 5–10 years | Climate, product quality, and exposure determine where your sealant lands in that range. |
| Conditions matter for application | Apply caulk above 7.2°C in dry weather to get proper adhesion and a lasting bond. |
| Spot repairs extend the schedule | Most homes need targeted repairs annually, not full reapplication every year. |
| Commercial properties need more structure | Multi-unit buildings benefit from phased reserve plans and formal inspection records. |
What 25 years of caulking in ontario has taught me
The most common mistake I see from homeowners is treating caulking as a one-time job. They have it done once, assume it is permanent, and then call us five or six years later wondering why there is water getting into the wall. Caulk is a consumable. It has a lifespan, and Ontario’s climate shortens it faster than most product specs suggest.
The second mistake is waiting for visible damage inside the home before acting. By the time you see a water stain on your ceiling or feel a draft at your window frame, the sealant has been failing for at least one or two seasons. The damage is already done. Annual inspection catches the problem at the joint, not after it has worked its way through the wall assembly.
I also see a lot of DIY recaulking done in the wrong conditions. October is fine for caulking if temperatures are still above 7°C and the forecast is dry. But I have seen homeowners apply caulk in November with frost on the ground, and that sealant will not bond properly. It looks fine for a few months and then peels off by spring. Doing the job in the right window matters as much as doing the job at all.
For complicated or aged exteriors, particularly older brick homes or properties with EIFS cladding, get a professional assessment before you start replacing sealant. The substrate condition and joint design affect which product you should use and how the joint needs to be prepared. A professional will catch things a visual inspection from the ground will miss.
— Felix
How Kettlecontracting can help you stay on schedule
Kettlecontracting works with homeowners and property managers across the Greater Toronto Area to set up practical caulking maintenance schedules that fit Ontario’s climate and your building’s specific needs. Whether you need a first-time inspection, a targeted spot repair, or a full perimeter reapplication, the team brings the same standard of workmanship to every job.

Start with the right preparation. Kettlecontracting’s window preparation guide walks you through what needs to happen before any sealant goes on, so the work lasts. If you are not sure what condition your current caulking is in, the caulking defect examples page shows you exactly what to look for. Contact Kettlecontracting to book a consultation and get a clear picture of where your exterior sealing stands.
FAQ
What is a standard exterior wall caulking schedule?
A standard exterior wall caulking schedule includes an annual visual inspection and full sealant replacement every 5–10 years, depending on climate and product condition. In Ontario, spring inspections after the freeze-thaw season are the most effective timing.
When is the best time to caulk exterior walls in ontario?
The best time to caulk exterior walls in Ontario is late april through early june or late august through early october, when temperatures stay above 7.2°C and humidity is low. These conditions allow proper adhesion and curing.
How do i know if my exterior caulk needs replacing?
Look for cracks, shrinkage, peeling edges, gaps at joints, or discolouration along the sealant bead. Any of these signs mean the seal is compromised and the joint needs attention before water gets behind the cladding.
Do commercial buildings need a different caulking schedule?
Yes. Commercial and multi-unit buildings typically require professional inspections every 3–5 years and full perimeter reapplication on the same cycle, compared to the 5–10 year residential standard. Structural sealants in commercial buildings also require adhesion testing per ASTM C1521.
Can i do spot repairs instead of replacing all the caulk at once?
Yes, and in most cases spot repairs are the right call. Replacement depends on observed performance rather than a fixed calendar, so if only a few joints have failed, address those and leave the rest until the next inspection cycle.