
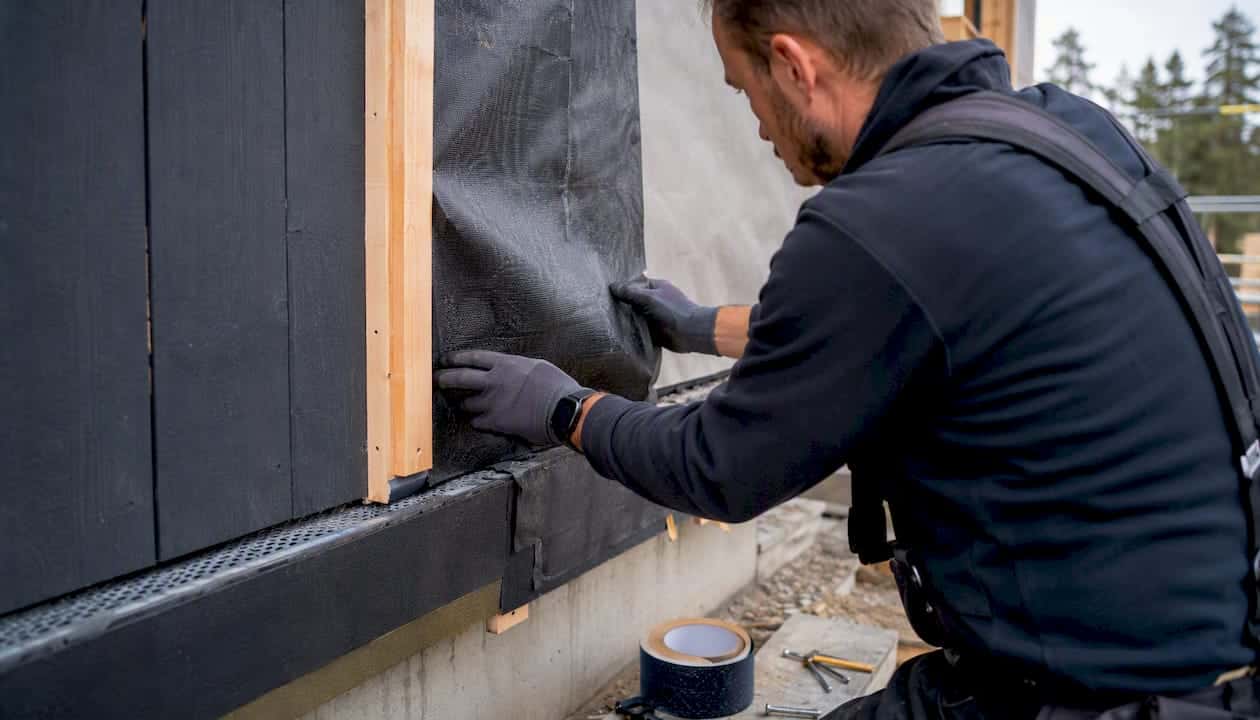
A two-stage sealing system pairs an outer water-shedding cladding with an inner drainage plane and air barrier that backs it up. If the first line lets water through, the second one catches it and drains it back out, instead of into your wall. Here’s what makes up that system and when your property needs it.
- Outer screen or cladding: sheds most of the rain before it ever touches the structure.
- Cavity (air gap): breaks capillary action and lets water drain and dry.
- Water-resistive barrier (WRB) / drainage plane: the true water-control layer behind the cladding.
- Flashings and weeps: direct water down and out at every window, door, and joint.
This approach follows guidance from the National Research Council of Canada (NRC) and the Rainscreen Association in North America (RAiNA). If you’re seeing repeat window leaks, rotted sills, caulking that fails every year or two, or damp patches that keep coming back no matter how much sealant goes on, you’re likely dealing with a wall that only has one line of defence. That’s Kettle Contracting territory.
Key Takeaways
A two-stage sealing system stops leaks by pairing an outer cladding that sheds rain with an inner drainage plane that catches and drains whatever gets through.
| Point | Details |
|---|---|
| Two lines of defence | Outer cladding sheds most rain; inner drainage plane and flashings handle the rest. |
| Continuity beats caulk | Shingle-lapped WRB and correctly sloped flashings matter more than fresh sealant. |
| Cavity width matters | Gaps around 3/4" to 1" support drainage and drying better than tighter minimums. |
| Repeat leaks signal a deeper issue | Recurring caulking failure usually means the drainage plane needs attention, not another tube. |
| Kettle Contracting diagnoses first | We inspect flashings, WRB continuity, and weeps before recommending any repair scope. |
Table of Contents
- How does two-stage sealing work?
- Why two-stage beats a face-sealed wall
- What are the recommended cavity, flashing, and weep specs?
- What causes two-stage sealing systems to fail?
- When should you hire a professional for a two-stage retrofit?
- Where to read more on rainscreen and drainage plane design
- Sources
- FAQ
How does two-stage sealing work?
Water hits a wall in three ways: as free-flowing rain driven by wind, as capillary moisture wicking through tiny gaps, and as vapour pushed by air pressure differences. A single caulk bead can’t stop all three at once, which is exactly why the two-stage approach exists.
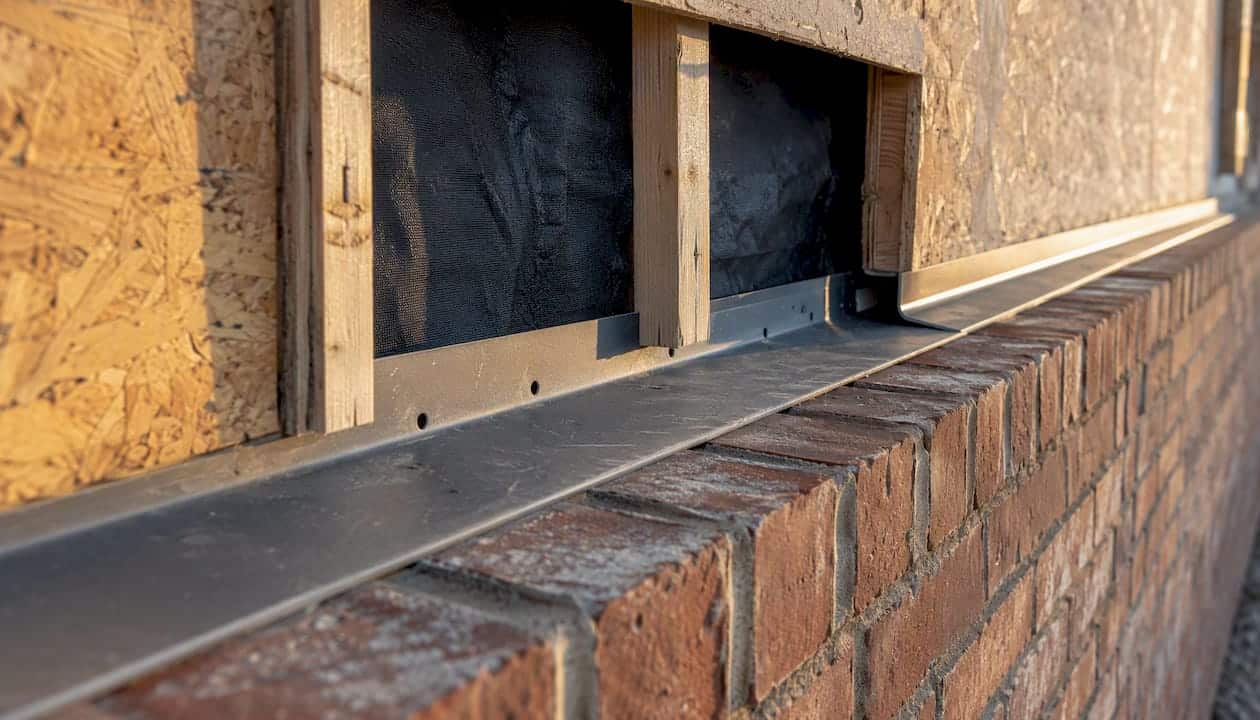
The outer cladding, whatever it is: brick, siding, stone, does the heavy lifting against direct rain. Behind it sits the cavity, an air gap that lets any water that gets past the cladding fall straight down instead of getting sucked sideways into the wall through capillary action. Behind that cavity is the real workhorse: the drainage plane, also called the water-resistive barrier or WRB. This layer is water-repellent, and it’s tied into flashings at every window, door, and transition so water has a continuous path down and out through weep holes at the base of the wall.
Continuity is everything here. The NRC’s detailing guidance is clear that shingle-lapped WRB material, layered like fish scales from top to bottom, keeps water moving down and away from every seam. Break that lap anywhere, even at one window head, and you’ve created a spot for water to collect instead of drain.
By the numbers: cavity width matters more than most owners assume. RAiNA’s technical guidance points to gaps around 3/4 inch to 1 inch as common practice for effective drying, though some jurisdictions allow minimums as small as 3/8 inch. Even a narrow gap beats no gap at all, but skinnier cavities dry slower and leave less room for error.
- Gravity pulls water down through the cavity and out the weeps.
- Air pressure differences can force water sideways through tiny cladding gaps if the inner air barrier isn’t sealed.
- Capillary action wicks water upward or sideways across surfaces that touch, which is why the air gap has to be a real gap, not a snug fit.
Why two-stage beats a face-sealed wall
A face-sealed, or one-stage, wall relies entirely on the exterior surface staying perfect. One caulking joint fails, one hairline crack opens in the stucco, and water has a direct route into the framing with nothing behind it to stop it. That’s the wall type most owners call us about, usually years after the original installer cut a corner.
Two-stage walls build in redundancy on purpose. Building science treats some water entry as inevitable, not a defect, so the drainage plane is there to catch what the cladding misses. There’s a longevity payoff too: because the inner air barrier sits behind the cladding, it’s shielded from UV rays and the freeze-thaw swings that chew through exterior sealants within a handful of years.
- Face-sealed walls put 100% of the pressure on one layer that ages, cracks, and needs constant recaulking.
- Two-stage walls spread the load, so a small failure in the outer layer doesn’t mean water in the drywall.
- The inner seal lasts longer because it’s protected from sun and temperature swings that break down exterior caulk fastest.
Pro Tip: If a contractor offers to fix a recurring leak with exterior caulking alone and never asks about what’s behind the cladding, ask them directly how water drains once it gets past that caulk line. If they can’t answer, they haven’t diagnosed the actual problem.
What are the recommended cavity, flashing, and weep specs?
Design details separate a wall that lasts decades from one that fails in five years. The cavity width, flashing slope, and weep spacing all matter more than the brand of sealant used on the face.
| Design Element | Practical Guidance |
|---|---|
| Cavity width | A minimum cavity size suitable for drainage and drying, with common practice favoring somewhat larger gaps. |
| Flashing slope | Sloped outward so water sheds away from the wall, never flat or reverse-pitched |
| Weep spacing | Placed low in the wall assembly with a clear, unblocked path to daylight |
| WRB continuity | Shingle-lapped from top down, or taped/sealed at every seam and penetration |
Flashings need enough upstand height at the back to tuck behind the WRB above them, and a drip edge at the front so water doesn’t creep back under the cladding. This is the detail that separates good work from a callback: shingle-lapping means each layer overlaps the one below it, so water always meets an edge pointing away from the wall.
The opposite, a reverse lap, happens when someone tucks the upper piece under the lower one during a repair. Water that should’ve run off the surface gets funnelled straight behind it instead. It’s one of the most common mistakes the NRC has documented in building failure investigations, and it’s almost always invisible until the drywall starts staining.
- Do: lap each WRB course over the one below, sealed or taped at seams.
- Don’t: tuck a lower flashing course under an upper one, even temporarily during a patch job.
- Do: keep weep holes clear of mortar droppings, insulation, or paint.
- Don’t: caulk over weep holes because they “look messy,” which seals in water instead of letting it out.
What causes two-stage sealing systems to fail?
Most failures trace back to a break in continuity, not a bad product. A reverse-lapped flashing at one window head, a weep hole clogged with paint, a WRB seam left untaped behind new siding: any one of these defeats the whole system, even if the exterior caulk looks flawless.
Repeated exterior caulking without addressing the drainage plane is the trap we see most often. Owners recaulk the same joint every spring, the leak keeps coming back, and nobody’s checked what’s happening behind the cladding. That approach doesn’t just waste money, it can mask a slow rot problem that’s getting worse every season it goes unaddressed.
Before calling anyone, walk the exterior and check for these signs:
- Staining or discolouration below windows or at wall transitions.
- Soft or spongy window sills when you press on them.
- Damp spots or bubbling paint on interior walls near exterior openings.
- Caulking that cracks or pulls away again within a year of being redone.
- Any spot where you can see daylight or feel airflow through a gap in the cladding.
If it’s one spot and the substrate’s still solid, a re-caulk might genuinely fix it. If it’s recurring at the same location season after season, that’s a drainage plane problem, and no amount of fresh sealant will solve it.
When should you hire a professional for a two-stage retrofit?
Call a building-envelope contractor once caulking stops holding, once you see rot, or once the leak shows up in more than one spot. Those are signs the drainage plane itself needs attention, not another tube of sealant.
Ask any contractor these questions before signing anything:
- How will you tie the new WRB into the existing drainage plane?
- What’s your plan for cavity width and airflow behind the cladding?
- Where will the weep holes go, and how will you keep them clear?
- What warranty do you offer, and what does it actually cover?
- Can you show me references for similar two-stage retrofit work?
A proper professional scope typically includes an inspection, a diagnostic opening if the failure point isn’t obvious from outside, flashing details rebuilt to shed water correctly, WRB installed or repaired with full continuity, a working cavity restored where cladding needs to come off anyway, and final joint sealing integrated with functioning weeps.
Pro Tip: Ask what happens to the drainage plane during the estimate, not just the cladding. A contractor who only quotes exterior caulking hasn’t actually diagnosed your wall.
What 25 years on Ontario jobsites has taught us
The mistake we see most: contractors chase the visible leak and never open the wall to check the drainage plane behind it. Reverse laps, blocked weeps, and untaped WRB seams cause more repeat calls than bad caulk ever does.
Fix the drainage plane first. Cosmetic recaulking on top of a broken system just delays the real repair, and it costs more in the long run.
Ready for a proper diagnosis, not another caulk tube?
If your property’s leak keeps coming back no matter how much sealant goes on, the fix usually isn’t more caulking, it’s fixing what’s behind it. Kettle Contracting inspects the actual drainage plane, corrects flashing laps, restores weep function, and only then does the finish joint sealing that most contractors treat as the whole job.

An estimate with us starts with a real look at what’s happening behind your cladding, not just a quote for tubes of sealant. We’ll tell you honestly whether you need a full retrofit or a targeted repair, and what that involves before any work starts. If you want to understand why this work needs a specialist rather than a general handyman, read our breakdown on why caulking is trade-specific work, then reach out for a diagnostic visit.
Where to read more on rainscreen and drainage plane design
For readers who want to dig into the technical standards behind this approach, a few sources cover different angles of the same principle.
- The NRC’s two-stage weathertightening guidance covers the core building-science definition and continuity rules for flashings and drainage planes.
- RAiNA’s technical bulletin defines rainscreen wall performance as an assembly, useful when comparing cavity strategies.
- BuildingScience’s white paper on water-managed wall systems walks through gravity-based drainage mechanics in plain terms.
Consult NRC material for flashing and continuity questions, RAiNA for cavity and assembly design, and BuildingScience for practical installation logic.
Sources
- NRC: two-stage weathertightening / rainscreen guidance
- RAiNA conference presentation: how rainscreens work (2024)
- BuildingScience: water-managed wall systems (practical white paper)
FAQ
What is a two-stage sealing system in simple terms?
It’s a wall design with two layers of water protection: an outer cladding that sheds most rain and an inner drainage plane that catches and drains whatever gets past it.
How is two-stage sealing different from regular caulking?
Regular caulking is a single, exposed seal that fails once UV and freeze-thaw cycles break it down. A two-stage system backs that seal up with a drainage plane so a caulk failure doesn’t mean an immediate leak.
What cavity size should a rainscreen wall have?
Common practice runs from about 3/4 inch to 1 inch for effective drainage and drying, though some codes allow minimums as small as 3/8 inch.
Why does my caulking keep failing in the same spot?
Repeated failure at one location usually points to a drainage plane or flashing problem behind the cladding, not a caulking issue. Recaulking without fixing that underlying detail just delays the real repair.
When should I call a contractor instead of recaulking myself?
Call a professional once you see recurring leaks, soft window sills, interior staining, or caulking that fails again within a year. Kettle Contracting can inspect the drainage plane and flashings to find the actual cause before recommending a fix.
