
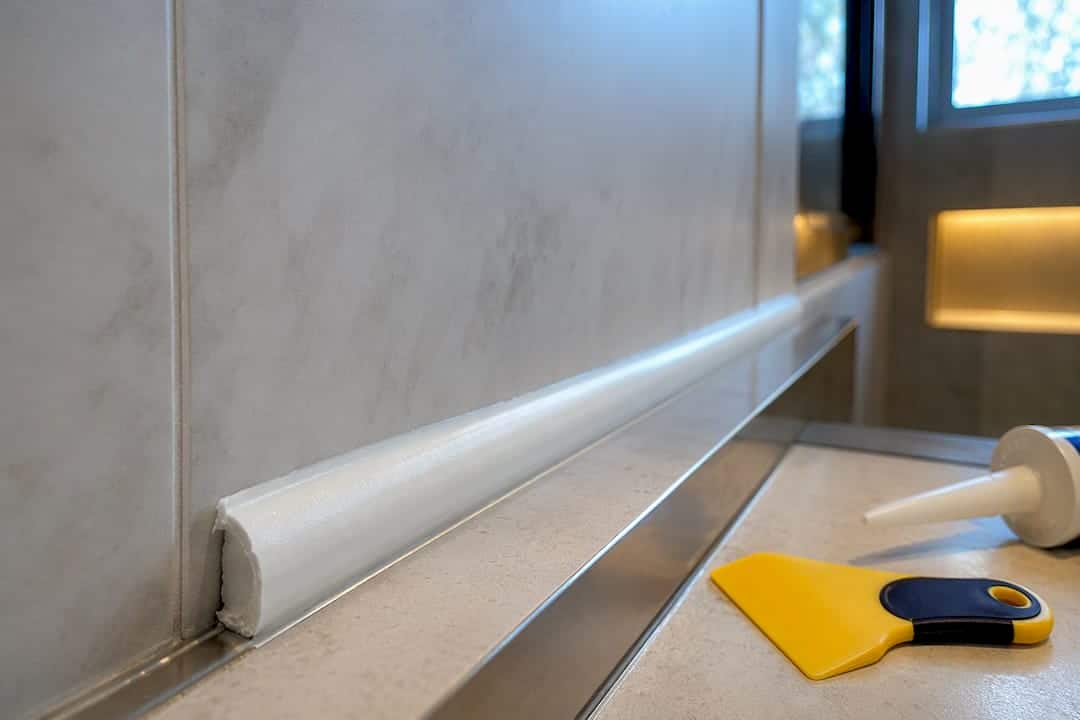
Most caulks are touch-dry within an hour, but that’s not the same as cured. Plan on roughly 24 hours before any bead sees water, and longer for thick joints, cold weather, or polyurethane products. Chemistry, bead depth, temperature, and humidity all shift that window, so the type-specific breakdown below matters more than any single number.
TL;DR:
- Caulk full cure times can extend beyond 24 hours, especially for thicker beads, cold, or humid conditions, so always double the manufacturer’s suggested cure time if in doubt.
- Bead depth, temperature, and humidity significantly influence cure duration, with deep or uneven beads requiring days longer to fully cure than thin, surface-dried beads.
- Conducting a skin test by pressing gently on the bead helps verify cure completeness, especially in critical or structural joints.
- Quick-drying silicone caulks are only tack-free in 30 to 60 minutes, while full waterproof and structural integrity take up to several days depending on the product.
- Always follow the label’s cure time for safe use, but be aware that external conditions and application specifics can delay full curing and water resistance.
Table of Contents
- What is caulk cure time, and why “dry” doesn’t mean “ready”
- How long does caulk take to dry and cure by type?
- What affects caulk curing time on the jobsite
- How to tell if caulk is actually cured
- When it’s safe to shower, paint, or expose caulk to weather
- How to help caulk cure right the first time
- Kettlecontracting’s take: when to DIY and when to call in a pro
- Where to check manufacturer cure times and technical details
- The straight answer on cure time, from someone who’s tooled a lot of beads
- Sources
- FAQ
What is caulk cure time, and why “dry” doesn’t mean “ready”
After 25 years running a caulk gun in every kind of Ontario weather, the question I hear most on a jobsite isn’t “how long does caulk take to dry.” It’s some version of “can I shower now?” And that mix-up between drying and curing is where most callbacks come from.
Drying, or “tack-free time,” is just the surface losing its stickiness. You can touch it, and your finger comes away clean. Curing is the full chemical reaction that turns a soft rope of sealant into a tough, flexible, waterproof gasket. Most silicone caulks are dry to the touch in 30 to 60 minutes, but they need 24 to 48 hours for a full cure.
Here’s the part that trips people up: caulk cures from the outside in. The skin forms first, sealing in the softer material underneath. A thin bead around a bathroom tile might cure through in a day. A thick bead packed into a deep gap between a window frame and brick can stay soft in the middle for days after the surface looks perfectly finished. That uncured core is why beads fail under movement, why paint cracks over them, and why water finds its way through a joint that looked done weeks earlier. If you’re caulking anything that has to hold back water or flex with seasonal movement, understanding what makes caulk actually last matters more than the number on the tube.
How long does caulk take to dry and cure by type?
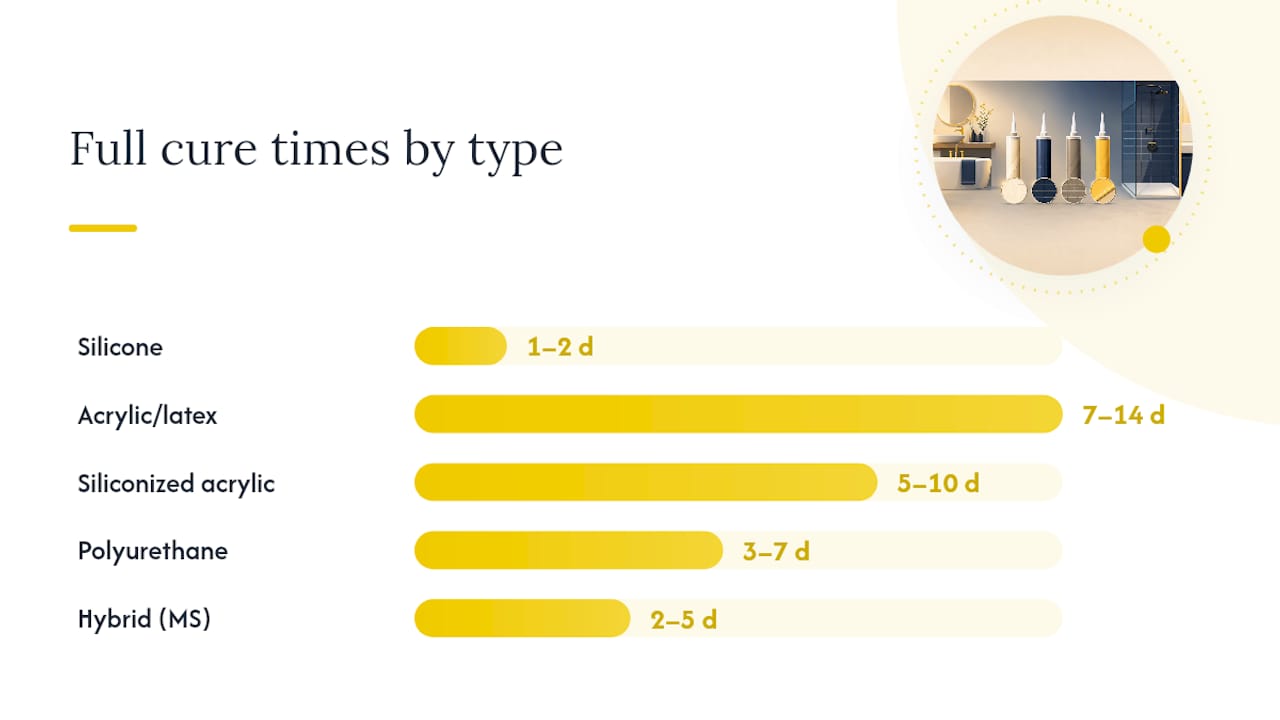
Every tube lists a cure time, but those numbers assume ideal shop conditions, not a cold garage in February or a humid bathroom in July. The ranges below give you a realistic planning window for the caulks most homeowners actually use.
| Caulk type | Touch-dry | Paint-ready | Full cure | Paintable? | Water-ready? |
|---|---|---|---|---|---|
| silicone | 30–60 min | Not paintable | 24–48 hours | No | Yes, after full cure |
| Acrylic/latex | 1–2 hours | 2–4 hours | 7–14 days | Yes | Wait for full cure |
| Siliconized acrylic | 1–2 hours | 2–4 hours | 5–10 days | Yes | Wait for full cure |
| Polyurethane | 1–3 hours | 24 hours+ | 3–7 days (thick beads longer) | Yes, once cured | Yes, after full cure |
| Hybrid/MS polymer | 30 to 60 minutes | 24 hours+ | 2–5 days | Yes, once cured | Yes, after full cure |
Straight silicone is the go-to for shower surrounds, tub surrounds, and anywhere water sits directly on the joint, because it’s genuinely waterproof but never take a paint brush to it. Acrylic latex is the painter’s caulk, easy to tool, cleans up with water, but it’s touch-dry only in the sense that the surface skins over. That 2 to 4 hour paint window applies in normal conditions; the full 7 to 14 days for complete cure is still happening underneath your paint job. Siliconized acrylic splits the difference, decent water resistance with paintability, but don’t expect true silicone-grade performance.
Polyurethane and hybrid MS polymer sealants are what we reach for on exterior expansion joints and masonry work, where movement tolerance and adhesion under weather matter more than convenience. They cure slower than silicone in most cases, particularly in thick beads, but they hold up to structural movement that silicone alone can’t handle. None of these numbers are guarantees. Bead depth, ambient temperature, and humidity all push these ranges wider, sometimes by days, which is exactly what the next section covers.
What affects caulk curing time on the jobsite
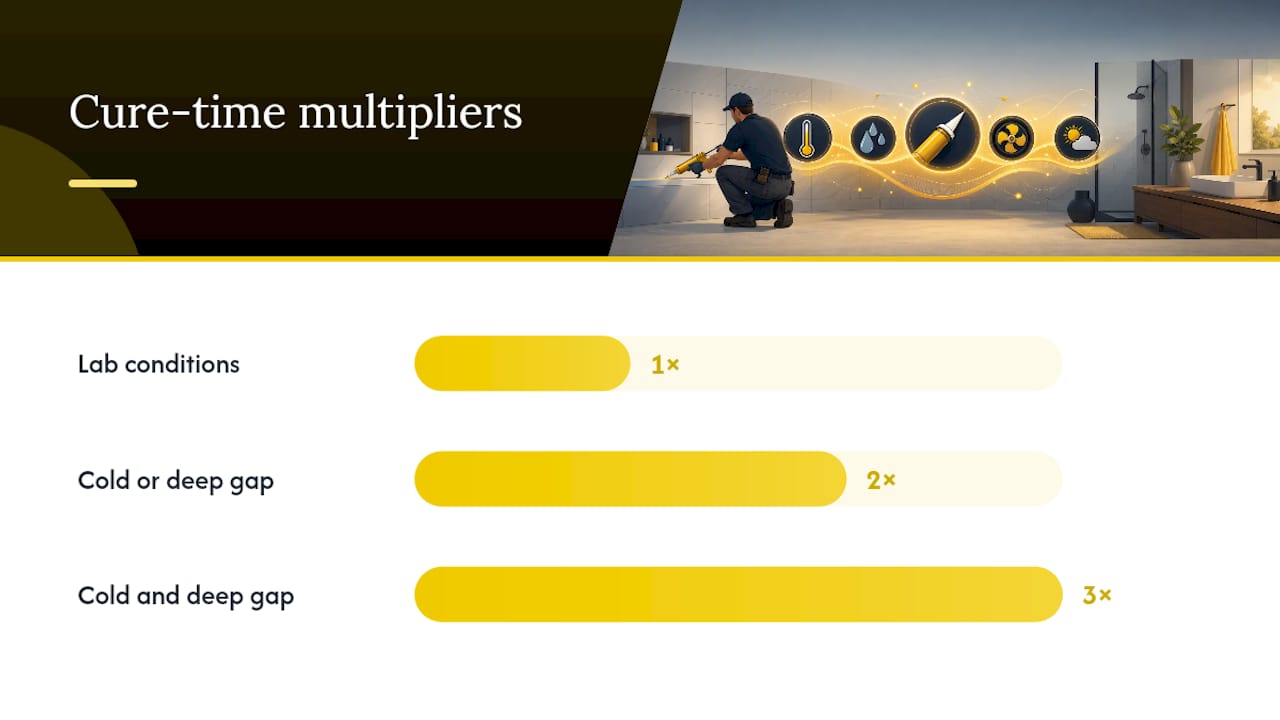
Manufacturer cure times are measured in a lab at 75°F (24°C) and 50% relative humidity. Your garage, your north-facing window, or your unheated basement rarely match that. If you’re caulking outside the recommended range, treat the tube’s stated cure time as a floor, not a schedule.
A few things change the math every time:
- Cold weather: Below about 5°C, chemical curing slows dramatically. Some silicones barely cure at all near freezing.
- Extreme heat or direct sun: High substrate temperatures can cause the surface to skin over too fast, trapping uncured material underneath.
- Humidity, and it cuts both ways: Moisture-cure silicones can actually cure faster in moderate humidity, while water-evaporation acrylics slow down when the air is already saturated.
- Bead thickness: A standard quarter-inch bead behaves nothing like a deep gap packed to fill a gap. Thicker or unevenly tooled beads can take days longer to cure through.
- Rain within the first hours: Water on an uncured bead can wash out the material or ruin adhesion before it ever sets.
The rule I give homeowners: if you’re working in cold, dry conditions, or you’ve had to fill a gap deeper than a standard bead, double your cure time estimate. Triple it if both apply. It’s a rough rule, but it keeps people from showering on day two when the joint needed four.
How to tell if caulk is actually cured
You don’t need lab equipment to check most household caulk jobs. What you need is a consistent, honest touch test, done properly.
Press a clean fingertip gently into the bead at a few spots along its length, not just one corner. Cured caulk should feel:
- Non-tacky with zero pull or stickiness on your finger
- Springs back to shape immediately after you release pressure
- Consistent firmness across the whole bead, not soft in the middle
A bead that skins over but still gives noticeably when you press harder likely has an uncured core. That’s the outside-in curing behaviour showing up in real time, and it’s the number one reason DIY jobs fail early. For anything critical, like a structural expansion joint or a spot where a leak would cause real damage, cutting a small sample from an inconspicuous end of the bead to check the interior is worth the two minutes it takes.
Some failures don’t show up right away either. A joint can look fine for weeks before movement or water exposure finds the soft spot underneath. If you’re at all unsure, default to the manufacturer’s stated full cure time rather than your own touch test.
Pro Tip: Build in a buffer on top of the label’s cure time whenever you’re working in a cooler garage, a north-facing exterior wall, or a deep gap around a window frame. An extra day costs you nothing. A redo costs you the whole weekend.
When it’s safe to shower, paint, or expose caulk to weather
Homeowners usually want one number: how long until I can use this. The honest answer depends on the task, so here’s how we sequence it on real jobs.
- Light touch or dusting: Safe once tack-free, usually within an hour or two for silicone and hybrid products.
- Painting over acrylic or siliconized acrylic: Wait at least 2 to 4 hours in normal indoor conditions, and lean toward the longer end if the room is cool or humid.
- Sink or countertop splash exposure: Give it a minimum of 12 hours, though 24 is safer if the bead has any real thickness.
- Shower or bath use: Plan on 24 hours minimum for standard silicone before running water directly on the joint. If you can wait a full day before that first shower, do it.
- Exterior rain exposure: Check the forecast before you start. Fresh beads exposed to rain within the first few hours can wash out entirely.
- Door or foot traffic across a caulked threshold: Hold off until full cure, not just touch-dry, especially with polyurethane, which can take 3 to 7 days depending on bead depth.
The tube’s label is the final word, always. If it says 48 hours and you’re tempted by a “fast dry” claim on the front of the packaging, read the fine print before you trust it. Fast-dry formulas usually shorten the tack-free window, not the full structural cure. If your project involves a shower surround specifically, a practical guide to shower wall waterproofing is worth a read before that first hot shower.
How to help caulk cure right the first time
Most cure problems trace back to prep and application, not bad luck with the weather. Get these right and you’re most of the way to a joint that lasts.
Before you ever pick up the gun:
- Clean the joint completely and let it dry, moisture trapped under new caulk has nowhere to go
- Strip out every trace of old, failed caulk rather than caulking over it
- Use a backer rod in any gap deeper than about a quarter inch so you’re not asking caulk to fill a cavity it was never meant to bridge
During application, tool your bead within 10 to 15 minutes of laying it down, before a skin forms. Keep the bead size proportional to the gap; overfilling a deep joint just guarantees a slower cure and a soft centre. And check the forecast: don’t lay a bead an hour before rain, and avoid application when temperatures sit outside the product’s stated range.
One more thing we see constantly: people trying to speed things along with a hair dryer or a space heater. Don’t. Forcing heat onto fresh caulk skins the surface fast while leaving the interior raw, which sets you up for cracking and adhesion loss months later. And whatever you do, don’t paint or load a joint before it’s fully cured, even if it looks finished. If you’re prepping window trim specifically, our guide on preparing windows for caulking walks through the prep steps in more detail.
Pro Tip: If you’re not sure which chemistry suits your surface, neutral-cure silicones are the safer bet on metal window frames and porous stone, acetoxy types can stain or corrode those materials over time.
Kettlecontracting’s take: when to DIY and when to call in a pro
We’ve torn out plenty of caulk jobs that failed within a year, and it’s almost always the same story: someone painted over a bead that hadn’t cured, or ran a shower the same night they finished the surround. The caulk looked fine going in. It cracked, pulled away, or let water behind the tile within months, and by then the damage was in the wall, not just the joint.
A simple bathroom re-caulk or a window sill touch-up is a reasonable DIY job if you respect the cure time and don’t rush it. Where we tell homeowners to call in help is anything involving a full building envelope, expansion joints on brick or stone, or a spot where a failed seal risks real water infiltration. That’s not us being precious about the work; it’s that those joints move with the building through freeze-thaw cycles, and getting the chemistry and bead depth wrong there costs a lot more than a bathroom redo. If you’re seeing recurring problems, a look through common caulking mistakes homeowners make is a good gut check before deciding.
Where to check manufacturer cure times and technical details
Cure times vary by brand and formula, so the tube’s own instructions always take priority over any general guide. A few sources worth bookmarking:
- Flex Seal’s silicone caulk FAQ covers touch-dry versus full cure timelines in plain terms.
- GE Sealants’ guide to weather and cure time breaks down how humidity and rain affect different chemistries.
- Penosil’s comparison of neutral versus acetoxy silicone explains which chemistry suits which substrate.
- A peer-reviewed look at cure kinetics in moisture-reactive sealants for anyone who wants the chemistry behind the outside-in cure behaviour.
The straight answer on cure time, from someone who’s tooled a lot of beads
Homeowners get burned by two habits: trusting the “dries in 30 minutes” line on the front of the tube, and assuming every caulk behaves like the last one they used. Neither holds up. The tube’s marketing copy is about tack-free time, not the structural cure your joint actually needs before it’s watertight or paintable.
What the evidence actually supports is simple: chemistry and bead depth decide your real timeline far more than any generic number does. A quarter-inch silicone bead in a warm bathroom and a deep polyurethane joint on a north-facing brick wall in November are not the same project, even if the label says “24 hours” on both tubes.
If you take one thing from this, prioritize the touch test and the conservative wait window over the clock. Press the bead, check the middle, not just the skin, and when a joint is load-bearing or structural, don’t guess. That’s where the real callbacks come from, and it’s the gap between what the label promises and what the jobsite demands.
— Felix
Sources
- Silicone caulk: 3 common questions answered
- How Long Does Caulk Take to Dry? Silicone & Acrylic Guide
- How Long Does Caulk Take to Dry?
- How weather impacts sealant cure time on the jobsite
- How long does caulk take to dry?
FAQ
Does caulk really need 24 hours to cure?
For most household silicone caulks, yes, plan on at least 24 hours before water exposure, even though the surface feels dry within an hour. Thicker beads or cooler rooms can push that closer to 48 hours.
How can I know when caulk is fully cured?
Press a clean finger into several spots along the bead. It should feel non-tacky, spring back immediately, and feel equally firm from edge to middle, not soft in the centre while the surface looks skinned over.
Can caulk get wet after 12 hours?
Twelve hours is enough for light splash exposure on thin silicone beads in warm conditions, but it’s not enough for direct water contact like a shower. Stick to the fuller 24-hour window before soaking a joint.
How soon can I shower after caulking?
Wait at least 24 hours for standard silicone caulk before running water directly on a fresh shower or tub seal. If the room is cold or the bead is thick, give it another day to be safe.
