
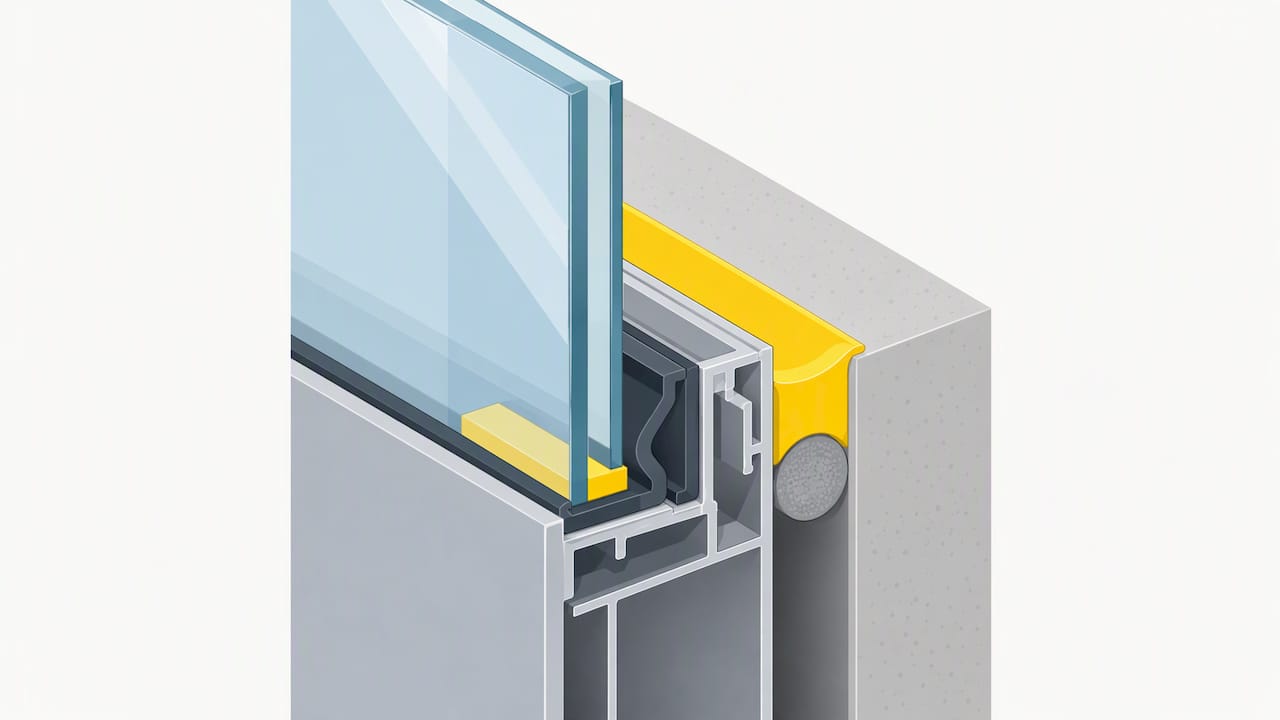
Curtain wall perimeter caulking is the sealant and air barrier work where the glass-and-aluminum wall meets the slab, the columns, the roof and the masonry around it. Done properly, it keeps rain and air out while the wall moves with the weather. Done badly, it looks fine for two winters, then lets water into places you can’t see. This guide covers how the perimeter should be built, why it fails in Ontario, and how to decide when to reseal.
TL;DR
- The perimeter is a moving joint, not a gap to fill. It needs the right width, depth, backer rod and sealant so it can stretch and compress.
- A two-stage approach is the standard: an air/vapour seal on the interior side and a rainscreen seal on the exterior.
- The most common cause of early failure is three-sided adhesion, not a bad tube of sealant.
- Never seal over weep holes or drainage paths. Blocked weeps damage the glass units from the inside.
- Resealing needs access, joint prep and compatible materials. Plan it as a maintenance job, not a quick patch.
Table of Contents
- What the perimeter of a curtain wall actually is
- Why perimeter sealant fails in the Greater Toronto Area and Durham Region
- Two lines of defence, not one
- Weeps, gaskets and the corners everyone forgets
- Signs your perimeter caulking needs attention
- Energy cost: why an open perimeter is expensive
- How a proper perimeter reseal is done
- Our perspective
- Choosing who does the work
- Work with Kettle Contracting
- FAQ
- Sources
What the perimeter of a curtain wall actually is
A curtain wall hangs off the building structure. It carries no floor loads. It only has to hold itself, resist wind and keep the weather out. That means every edge where it meets something else is a joint that has to handle movement.
The perimeter usually includes:
- Slab edges and floor lines, where the wall passes each storey.
- Side junctions with columns, shear walls, brick or block.
- Head and sill conditions at the top of the wall and the base.
- Roof interfaces, where water running off the roof hits the wall.
- Penetrations and transitions to storefronts, doors and louvres.
The sealant at these locations is only one layer. Behind it sit the air barrier, flashing, insulation and sometimes a fire-stop at the slab edge. When we look at a failed perimeter, the sealant is the part you can see, but the problem is often the layers behind it.
Why perimeter sealant fails in the Greater Toronto Area and Durham Region
We’ve worked in this region for 25 years, and the pattern doesn’t change. A joint that opens by a few millimetres in January and closes in July is being asked to do that hundreds of times over its life. Add wind load on a tall wall, sun on the south face and freeze-thaw cycles, and any weakness shows up fast.
Three-sided adhesion
Building guidance for the Canadian industry points to three-sided adhesion as the most frequent reason sealant fails early. When sealant sticks to both sides of the joint and also to the backer rod or the bottom of the joint, it can’t stretch freely. It tears the first time the building moves.
The fix is simple in principle:
- Use closed-cell backer rod sized to the joint, so it sets the sealant depth.
- Use a bond breaker where there’s no rod, so the sealant holds on two sides only.
- Keep the width-to-depth ratio correct for the sealant you’re using.
It’s also the step most often skipped on a rushed job, because a joint filled with sealant to the bottom looks full and tidy.
Not enough room to work
Many installation problems start on the drawings. Construction Canada notes that details should allow at least 50 mm (2 in.) of clearance, plus outward tolerance, so the building can move differently from the wall and so crews can get in later to maintain and reseal. If the joint is tight, sealing it properly becomes a compromise.
On an existing building you can’t change the drawings. What you can do is assess the real joint size before quoting, not after the work starts.
Materials that don’t get along
Sealants, gaskets, setting blocks and backer rods all touch each other. Compatibility needs to be confirmed with the sealant manufacturer’s testing before installation. A premium sealant against an incompatible gasket can stain, soften or lose adhesion. This is why we ask what is already in the wall before choosing a product, and why the cheapest tube on the shelf is rarely the cheapest answer.
For a closer look at product choice on windows, see our guide on which type of caulk is best for exterior windows.
Two lines of defence, not one
CMHC’s best practice guide on curtain walls describes a two-stage joint approach: a primary air and vapour seal toward the interior, and a secondary rainscreen seal toward the exterior. The space between them is meant to equalize pressure and drain.
Why it matters to you as an owner:
- If you rely only on the exterior bead, any pinhole lets water straight into the wall.
- If the interior seal is missing or cut, warm indoor air carries moisture into the cavity and condenses on cold surfaces.
- If someone fills the cavity with sealant “to be safe”, they defeat the pressure equalization that keeps rain out.
The national research council’s work on these walls makes the same point in plain terms: curtain walls are active systems that move and drain. Good maintenance keeps those paths open. It doesn’t just add caulk.
Weeps, gaskets and the corners everyone forgets
When we’re called to a curtain wall with fogged glass units, the perimeter bead usually isn’t the first suspect. Water is sitting in the glazing pocket.
If weep holes are blocked or missing, water ponds in the glazing cavity, and that shortens the life of the insulating glass unit seals. Before any resealing, check:
- Weeps are clear at the sills and horizontal members.
- Gaskets at the horizontal-to-vertical intersections are intact. Construction Canada’s guidance on steel curtain walls says these intersections need sealing to direct water out, not into the wall assembly.
- Sealant hasn’t been smeared over drainage slots during a past repair.
Those intersections matter for another reason. Proper sealing of the frame intersections keeps water from reaching internal steel members and causing corrosion. That is damage you’ll pay for long after the sealant bill.
The roof edge
Where a curtain wall stops at a roof, CMHC recommends a waterproofed curb that lifts the top of the wall at least 200 mm (8 in.) above the roofing surface. It lowers the chance of roof runoff getting in. If your wall sits almost flush with the roof and you see staining below, mention it when you call a contractor.
Signs your perimeter caulking needs attention
You don’t need a lift to get a first read. Walk the building after a rain and look from the inside as well as the outside.
| What you see | What it often means |
|---|---|
| Sealant cracked, split down the middle | Joint has been moving more than the sealant can take |
| Sealant pulled away from one face | Poor prep or primer, or a compatibility problem |
| Sealant hard, chalky or shrunken | Age and UV exposure |
| Staining or efflorescence below the joint | Water is passing behind the seal |
| Drafts or whistling at the slab edge | Interior air seal is open |
| Condensation or fog between glass panes | Water has been sitting in the glazing pocket |
| Damp drywall or ceiling tiles at the perimeter | Water is reaching the interior |
One warning: small leaks are the dangerous ones. Building scientists have been saying for years that the invisible leaks do the most harm. Owners watch for the big visible gap, while small framing joints and perforations slowly feed moisture into the assembly.
For more on how we read these defects on site, see our article on construction defect caulking examples.
Energy cost: why an open perimeter is expensive
The CAGBC reports that air infiltration can account for up to 30% of heating and cooling costs in Canadian buildings, and that some sealing technologies have cut leakage by as much as 98%. That second number comes from a specific envelope-sealing product, so don’t expect it from a caulking job alone. A well-sealed perimeter is one piece of the envelope, and the results you see depend on the building.
Still, the perimeter is a long, continuous line. On a multi-storey wall, that’s a lot of linear metres where air can get through. Our articles on reducing HVAC costs with building air sealing and caulking and energy efficiency go further into this.
How a proper perimeter reseal is done
The sequence is where the quality is. A reseal that skips steps fails on the same schedule as the one it replaced.
- Survey the wall. Measure joint widths, note the existing materials, find weeps and look for water paths. Test for adhesion where you can.
- Confirm compatibility. Check the new sealant against the gaskets, rods and substrates with the manufacturer’s guidance.
- Remove the failed sealant fully. Cut it out cleanly on both faces. Don’t caulk over old caulk.
- Prepare the surfaces. Clean, dry and prime where the manufacturer requires it. Metal, glass, stone and masonry each have their own needs.
- Install backer rod to the right depth. Set the depth so the sealant has the correct width-to-depth ratio, with no bonding at the back.
- Gun and tool the sealant. Fill the joint without voids and tool it firmly so it wets both faces.
- Protect the drainage. Leave weeps and pressure-equalization paths open.
- Inspect and document. Photograph the finished joints and record the products used.
Weather matters. We don’t seal in rain, or on frosted or damp surfaces, and cold snaps affect cure and adhesion. That’s one more reason Ontario work is usually booked from late spring through early fall, with only the right days used in the shoulder seasons.
Access and safety
Upper floors need a swing stage, a lift or rope access. That cost belongs in the plan, and it’s a good reason to do all the joints at once rather than a stretch at a time. Your property manager or building engineer will know what is allowed on your site.
Once the sealing is finished, the glass usually needs cleaning too. Commercial cleaners handle this kind of job, for example post-construction window cleaning for commercial buildings in Calgary if you’re in Alberta. In the GTA you’ll want a local provider.
Our perspective
After 25 years sealing buildings across Durham Region and the GTA, we’d put it this way: the sealant is the cheap part, and the prep and the thinking are the work.
Here is what we’ve learned.
- Look at the whole joint, not just the bead. If water is getting in, it’s rarely because someone didn’t use enough caulk.
- Match the fix to the cause. A joint that tore from three-sided adhesion needs a rebuilt joint. A joint that has simply aged needs a clean replacement. They aren’t the same job.
- Don’t chase the cheapest number. A low quote that skips backer rod and primer will cost more in two years, once you add access equipment a second time.
- Be honest about limits. If the problem is in the curtain wall system itself, such as missing flashing or a failed air barrier, we’ll say so, and we’ll tell you to bring in the building envelope consultant or the wall’s manufacturer. Sealant won’t fix a design fault.
- Choose materials for Ontario. The winter swing from deep cold to summer heat is hard on every joint.
We prefer to explain a joint on site, with you looking at it, than to hand over a quote with no detail. Our guide to exterior joint sealing types shows how we think about joint choices, and why caulking is trade-specific work explains why a general handyman approach tends to fall short.
— Felix
Choosing who does the work
Whether you manage a mid-rise, own a commercial plaza or run a multi-unit property, ask any contractor these questions before you sign:
- Will you survey the joints and tell me the widths and materials before pricing?
- How do you control joint depth, and do you use backer rod or bond breaker?
- How do you confirm compatibility with existing gaskets and substrates?
- What happens to the weeps and drainage?
- Are you fully insured, and can I see proof?
- What is covered if a joint fails, and who comes back to look at it?
A straight answer to each of these tells you more than a brochure. If a bidder can’t explain why a joint is sized the way it is, keep looking.
Work with Kettle Contracting
We seal windows, doors, expansion joints and full building envelopes for residential and commercial properties across the GTA, including Oshawa, Whitby, Ajax, Pickering, Bowmanville and Cobourg. If you have a glazed wall, storefront or window wall that needs attention, start with our commercial window caulking page or our building envelope sealing service. If the movement joints in your structure are the concern, see expansion joint sealing. We’re happy to walk the building with you and give clear, honest pricing before work starts. You can reach us through kettlecontracting.com.
FAQ
How often should curtain wall perimeter caulking be replaced?
There’s no single number, because it depends on the sealant, the exposure and how the joint was built. Inspect it yearly and after severe weather, and plan a reseal when you see cracking, adhesion loss or hardening. Check the manufacturer’s documents for your sealant and any warranty terms.
Can I just caulk over the old sealant?
No. New sealant doesn’t bond reliably to aged sealant, and it makes the joint shallower and less able to move. Remove the old material, clean the faces and rebuild the joint with the right backer rod.
Is silicone always the right sealant for curtain wall perimeters?
Not always. The right product depends on what it touches and how much the joint moves, and it has to be compatible with the gaskets and substrates. Confirm with the manufacturer’s testing before installing, as the Construction Canada guidance advises.
Will new perimeter caulking stop a leak?
Only if the sealant is the cause. Leaks can also come from blocked weeps, open frame intersections, missing flashing or a failed interior air seal. A survey that traces the water path comes first.
Do you work on large commercial buildings?
We handle commercial window caulking and building envelope sealing across the GTA. Contact us with the building details and we’ll tell you honestly whether the job suits us or needs a specialist.
Sources
- CMHC, Best Practice Guide: Curtain Wall
- National Research Council Canada, curtain wall performance
- Construction Canada, Curtain wall requirements imply teamwork
- Construction Canada, Guide to designing and installing commercial IGU glazing
- Construction Canada, Specifying steel curtain walls with enduring beauty
- Construction Canada, Glass curtain walls: Framing design and performance
- CAGBC, Ask the Expert: Nerva Energy Group