Building air sealing is the process of closing uncontrolled gaps and cracks in your home’s envelope to stop conditioned air from escaping and outdoor air from entering. Air leakage causes 25–40% of heating and cooling energy loss in typical homes, making it the single largest source of envelope energy waste. Properly sealing those leaks can improve total home energy efficiency by 20–30%, with bill reductions exceeding 50% in very leaky buildings. The tools professionals use include caulk, spray foam, weatherstripping, and blower door tests. For Ontario homeowners and property managers, this is the most cost-effective first step to reduce HVAC costs through building air sealing.
Where are the biggest air leaks in your home?
Most homeowners blame their windows when they feel a draft. Windows are rarely the largest leak source. Attic bypasses, rim joists, and chimney flues account for the bulk of air loss in most Canadian homes. Understanding where leaks actually occur lets you spend your time and money where it counts.
The most common air leakage points in residential buildings include:
- Attic bypasses: Gaps where interior walls meet the attic floor allow warm air to rise and escape. This is often the single largest leak path in older Ontario homes.
- Rim joists: The framing at the top of your foundation wall is a major entry point for cold, damp crawlspace air. Sealing rim joists is critical in Ontario homes because it prevents cold air from migrating upward into living spaces.
- Chimney flues and fireplace surrounds: The gap between the chimney masonry and surrounding framing is rarely sealed properly.
- Electrical penetrations: Outlet boxes on exterior walls and light fixtures in insulated ceilings are common leak points that most homeowners overlook.
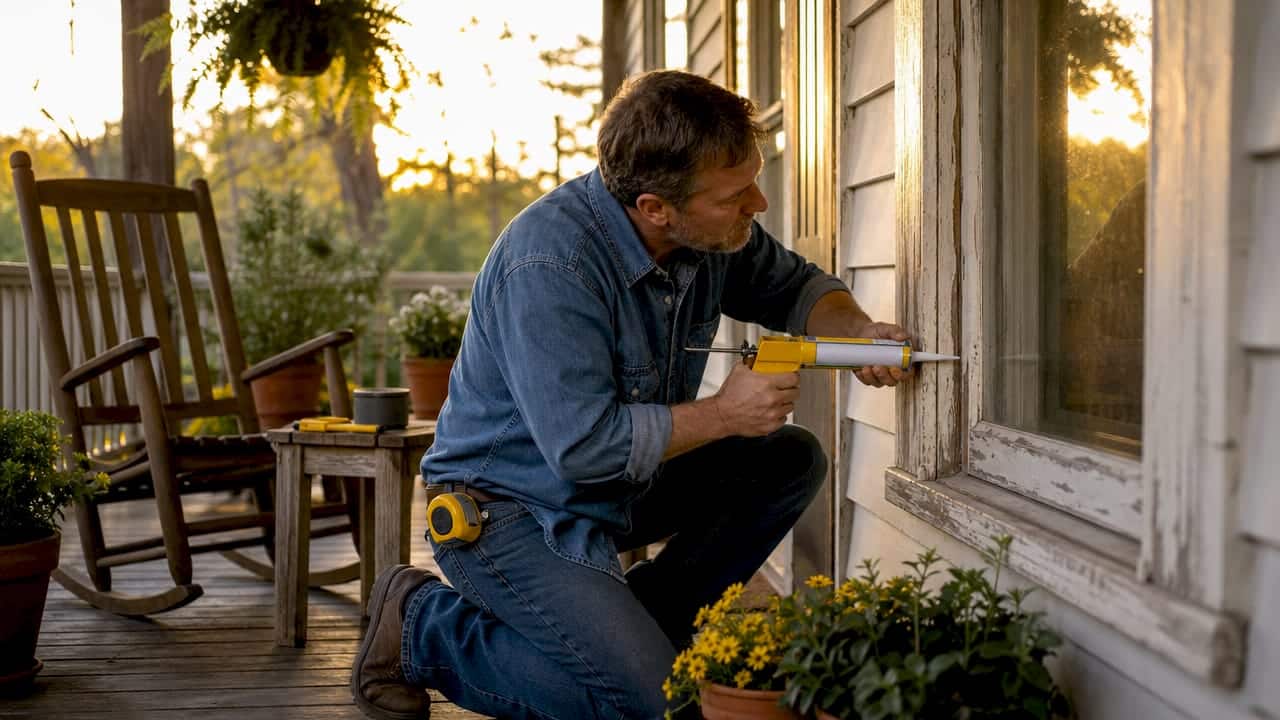
- Door and window frames: The perimeter caulking around frames fails over time, especially through Ontario’s freeze-thaw cycles.
The stack effect explains why these leaks matter so much. Warm air rises and exits through gaps at the top of your home, and cold air is drawn in through gaps at the bottom to replace it. Your furnace runs longer to compensate for that constant exchange.
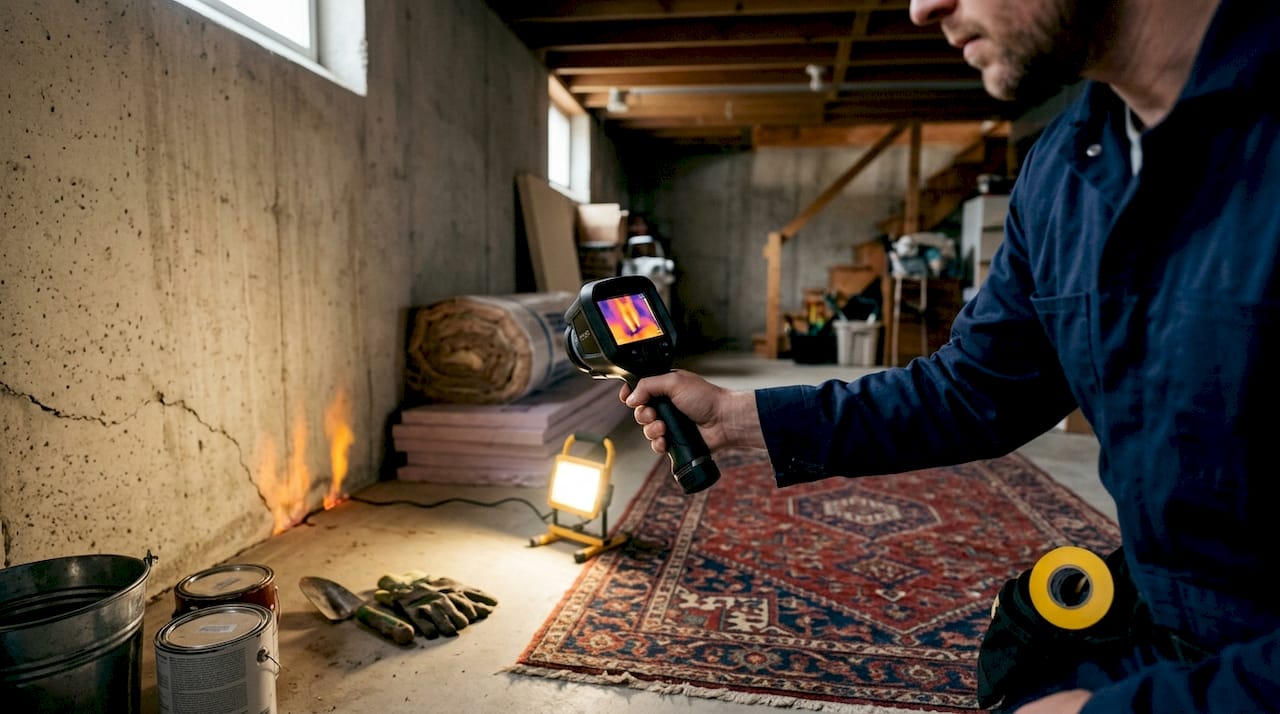
Pro Tip: A blower door test, combined with thermal imaging, is the most reliable way to locate leaks before you start sealing. A certified energy auditor can map every major gap in your building envelope in a single visit, saving you from guessing and sealing the wrong spots first.
What materials work best for air sealing in Ontario’s climate?
Choosing the right material for each application is not optional. Air barriers and vapour barriers serve different purposes, and using a non-breathable vapour barrier in the wrong climate zone risks trapping moisture inside your wall assembly, causing mould and structural damage over time. Ontario sits in a mixed-humid to cold climate zone, so material selection matters.
Here is a practical step-by-step approach to selecting and applying air sealing materials:
- Assess the gap size first. Gaps under 6 mm wide are best sealed with latex or silicone caulk. Gaps between 6 mm and 25 mm call for backer rod plus caulk. Gaps larger than 25 mm need spray foam or rigid blocking before any sealant is applied.
- Choose latex caulk for interior trim and painted surfaces. It is easy to apply, paintable, and flexible enough for minor seasonal movement. It is not suitable for exterior applications exposed to standing water or UV.
- Use silicone caulk for exterior joints around windows and doors. Silicone bonds to most substrates, handles temperature extremes, and does not shrink. It is the right choice for Ontario’s climate where joints expand and contract significantly between seasons.
- Apply spray foam for rim joists and large irregular gaps. Closed-cell spray foam provides both air sealing and insulation value. Use it in the basement rim joist area where cold and moisture are both concerns.
- Use weatherstripping for moveable components. Door sweeps, compression seals, and foam tape handle the gaps around doors and operable windows that caulk cannot bridge without cracking.
- Allow full cure time before painting or covering. Silicone caulk typically needs 24 hours to cure. Spray foam needs 1–2 hours before trimming and 24 hours before covering with a thermal barrier.
Pro Tip: Always clean and dry the substrate before applying any sealant. Caulk applied over dust, old paint, or damp surfaces will fail within one or two seasons. A quick wipe with isopropyl alcohol on non-porous surfaces makes a real difference in adhesion and longevity.
Improper material choices cause two common failures: premature cracking from using rigid caulk on a flexible joint, and moisture trapping from using vapour-impermeable foam in a wall assembly that needs to dry inward. Both failures are expensive to fix.
How to carry out a DIY air sealing project safely
A DIY air sealing project is well within reach for most homeowners. DIY projects typically cost $200–$600 and pay back within 1–2 years. That payback period is faster than almost any other home energy upgrade.
Tools and materials you will need
| Item | Estimated cost | Notes |
|---|---|---|
| Caulking gun | $15–$40 | A smooth-rod gun gives better control |
| Silicone caulk (exterior) | $8–$15 per tube | One tube covers roughly 15 linear metres |
| Latex caulk (interior) | $5–$10 per tube | Use for trim, baseboards, interior gaps |
| Spray foam cans | $10–$20 each | Use low-expansion foam near window frames |
| Weatherstripping kit | $20–$50 | Door sweeps and compression seals |
| Utility knife and scraper | $10–$20 | For removing old, failed sealant |
| Safety glasses and gloves | $10–$15 | Required when working with foam |
The sealing workflow
Follow this sequence to get the most out of your time and materials:
- Inspect first. Walk the perimeter of your home on a cold, windy day and feel for drafts at outlets, baseboards, and door frames. Check the attic hatch and basement rim joist area.
- Prioritise by impact. Seal attic bypasses and rim joists before touching windows. These areas deliver the largest energy savings per hour of work.
- Clean all surfaces. Remove old caulk with a scraper and clean the joint with a dry cloth. Skip this step and the new sealant will not last.
- Seal from the inside out. Start with interior gaps, then move to exterior joints. Interior work is easier to do in cold weather and does not depend on outdoor temperatures.
- Verify your work. After sealing, recheck the same spots on a cold day to confirm the draft is gone. A stick of incense held near a joint will show any remaining air movement.
One critical safety note: never seal combustion air vents, dryer exhaust vents, or bathroom exhaust fans. Blocking these openings creates carbon monoxide and moisture hazards. If you are unsure whether an opening is a combustion air supply, consult a licensed HVAC technician before sealing it.
DIY vs. professional air sealing: which is worth it?
Both DIY and professional air sealing deliver real savings. The right choice depends on your building type, the severity of the leakage, and your comfort level with the work.
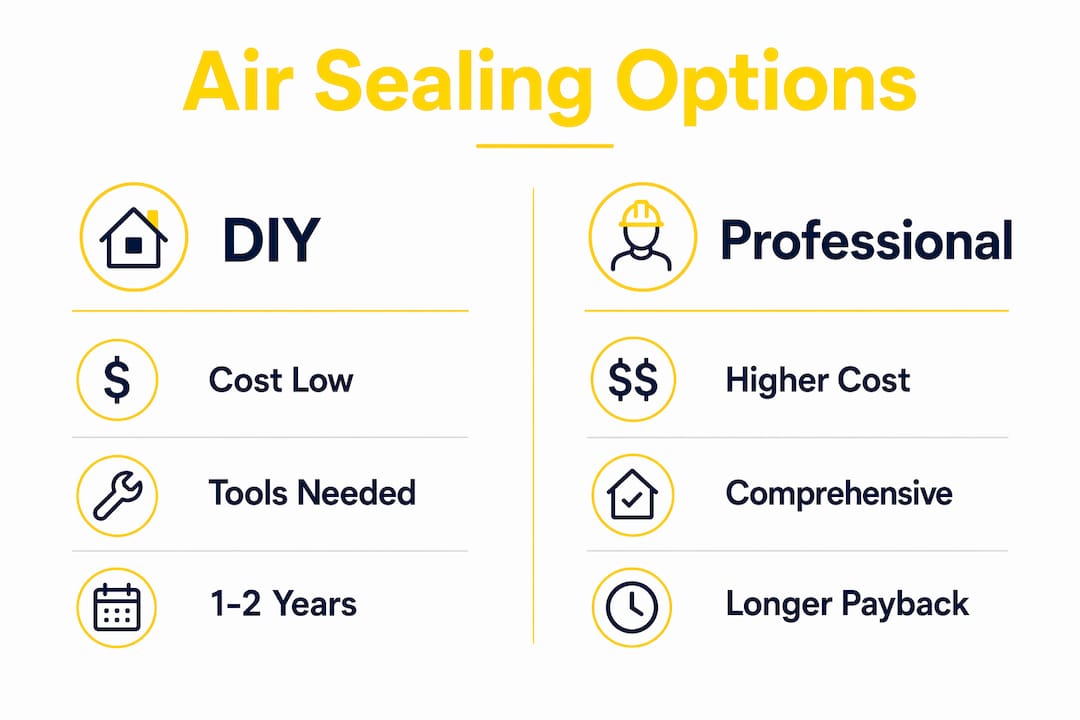
| Factor | DIY | Professional |
|---|---|---|
| Typical cost | $200–$600 | $1,000–$3,000 |
| Payback period | 1–2 years | 2–4 years |
| Leak detection method | Visual inspection, incense test | Blower door test, thermal imaging |
| Coverage | Accessible gaps and joints | Whole-building envelope including hidden bypasses |
| Code compliance | Homeowner responsibility | Included in professional scope |
| Best suited for | Single-family homes, minor leakage | Multifamily, commercial, severe leakage |
Professional air sealing includes blower door testing, comprehensive sealing, and proper ventilation checks. That combination reduces long-term energy losses and avoids indoor air quality problems that DIY work can miss. For property managers overseeing commercial buildings or multi-unit residential properties, professional services are the practical choice because they ensure code compliance and provide documentation.
Pro Tip: Request a post-sealing blower door test from your contractor. It gives you a before-and-after air changes per hour reading, which is the clearest proof that the work actually reduced your building’s leakage rate.
The higher upfront cost of professional work is offset by more thorough results. A professional finds the hidden bypasses in your attic that a DIY inspection misses, and those bypasses are often responsible for the majority of your heating bill.
How does air sealing work with insulation and ventilation?
Air sealing must come before insulation. Sealing before insulating prevents warm air from bypassing the insulation entirely, which wastes the insulation’s effectiveness and risks moisture damage inside the wall or ceiling assembly. Adding insulation over unsealed gaps does not fix the air leakage problem.
The combined effect is significant. Combining air sealing with insulation yields 15–40% savings on heating and cooling costs, compared to 5–15% for insulation alone. That gap reflects how much energy air movement wastes compared to conductive heat loss.
After major air sealing work, mechanical ventilation becomes necessary. A tightly sealed home does not breathe on its own. A heat recovery ventilator (HRV) or energy recovery ventilator (ERV) brings in fresh outdoor air while capturing most of the heat from the outgoing stale air. Without one, a well-sealed home can develop elevated humidity, CO2 levels, and volatile organic compound concentrations.
Additional upgrades that complement air sealing include:
- Attic insulation top-up: Once attic bypasses are sealed, adding blown-in insulation above the air barrier captures the full benefit of both measures.
- Smart thermostats: Devices like the Ecobee or Nest Learning Thermostat can deliver roughly 8% additional annual savings on top of the gains from sealing and insulation.
- Annual HVAC maintenance: A clean, well-tuned furnace or heat pump works more efficiently in a sealed building. The two upgrades reinforce each other.
Air sealing benefits extend beyond lower bills. A tighter envelope also reduces outdoor noise, keeps pollen and dust out, and stabilises indoor humidity. For Ontario homeowners dealing with cold winters and humid summers, those secondary benefits are real and noticeable.
Key takeaways
Building air sealing is the single most cost-effective step you can take to lower HVAC operating costs, delivering 20–30% energy savings when done correctly and even more when combined with insulation upgrades.
| Point | Details |
|---|---|
| Air leakage is the top energy waster | Leaks cause 25–40% of heating and cooling loss, more than any other envelope issue. |
| Target attics and rim joists first | These areas deliver more savings per hour of work than window replacements. |
| Seal before you insulate | Adding insulation over unsealed gaps wastes money and risks moisture damage. |
| DIY pays back in 1–2 years | A $200–$600 DIY project is one of the fastest-payback home energy investments available. |
| Ventilation is required after sealing | Install an HRV or ERV after major sealing work to maintain healthy indoor air quality. |
What 25 years of sealing Ontario buildings has taught me
The most common mistake I see is homeowners spending thousands on new windows when their attic is leaking like a sieve. Windows get blamed because you can feel the cold radiating off the glass, but that sensation is radiant heat loss, not air leakage. The actual air movement is usually coming from the attic hatch, the rim joist, or the gap behind the kitchen cabinets where the plumber ran a pipe through the exterior wall.
The second mistake is using the wrong caulk for the job. Interior latex caulk on an exterior joint will crack within one winter in Ontario. I have seen it happen on brand-new builds. The freeze-thaw cycle here is brutal, and joints move more than people expect. Silicone or a high-quality siliconised acrylic is the minimum for any exterior application.
Regular inspection and maintenance of air sealing are non-negotiable. Buildings shift and settle over time, and new gaps open up every few years. I recommend checking your caulking and weatherstripping every autumn before the heating season starts. Catching a failed joint in october costs you one tube of caulk. Missing it costs you a full winter of elevated heating bills.
The last thing I will say is this: get a building energy audit before you spend a dollar on upgrades. A blower door test and thermal scan will tell you exactly where your money should go. I have seen homeowners skip the audit, seal the wrong areas, and still wonder why their bills did not drop. The audit pays for itself in the first year by directing your effort to the right spots.
— Felix
Kettlecontracting’s sealing services for Ontario homeowners
Kettlecontracting specialises in professional caulking and air sealing for residential and commercial properties across the Greater Toronto Area. Our team handles window perimeters, door frames, exterior joints, and full building envelopes using materials selected for Ontario’s climate.

If you are preparing for a sealing project, start with our detailed guide on preparing windows for caulking to understand what proper surface preparation looks like before any sealant goes on. For homeowners weighing the cost of professional work, our window caulking cost-benefit analysis breaks down the numbers clearly. Contact Kettlecontracting for a consultation and get an honest assessment of where your building is losing energy.
FAQ
How much can air sealing reduce my heating bill?
Properly sealing air leaks can improve total home energy efficiency by 20–30%, with reductions exceeding 50% in very leaky buildings. Results depend on how leaky the building was before sealing.
What is the difference between an air barrier and a vapour barrier?
An air barrier stops bulk airflow through the building envelope. A vapour barrier controls moisture diffusion through materials. Using the wrong one in Ontario’s climate can trap moisture and cause structural damage.
Should I seal my home before adding insulation?
Air sealing must come before insulation. Adding insulation over unsealed gaps allows warm air to bypass the insulation entirely, wasting both the material and the labour cost.
How do I know if my home needs professional air sealing?
A blower door test is the definitive way to measure your home’s air leakage rate. If your heating bills are high and drafts persist after DIY sealing, a professional assessment is the right next step.
Does air sealing affect indoor air quality?
A tightly sealed home requires mechanical ventilation to maintain healthy air quality. An HRV or ERV brings in fresh air while recovering heat, keeping the building both tight and healthy.