
Caulking maintenance is defined as the systematic inspection, removal, and replacement of sealant at joints, seams, and penetrations throughout a rental property. The best time to handle caulking repairs between tenants is during the turnover window, before a new occupant moves in. This is when surfaces are accessible, the unit is empty, and you can do the job properly without disrupting anyone. Done right, tenant caulking maintenance protects your building from water intrusion, reduces energy loss, and keeps your property in the condition that attracts and retains good tenants.
What tools and materials do you need for caulking repairs between tenants?
Choosing the right materials is where most landlords either get it right or waste their money. The industry standard for high-risk wet areas like bathrooms and kitchens is 100% silicone sealant. Silicone-based sealants can last 20–50+ years when applied correctly, while basic acrylic latex often fails within 1–2 years. That gap in lifespan is the difference between a repair that holds through five tenant cycles and one you redo every year.
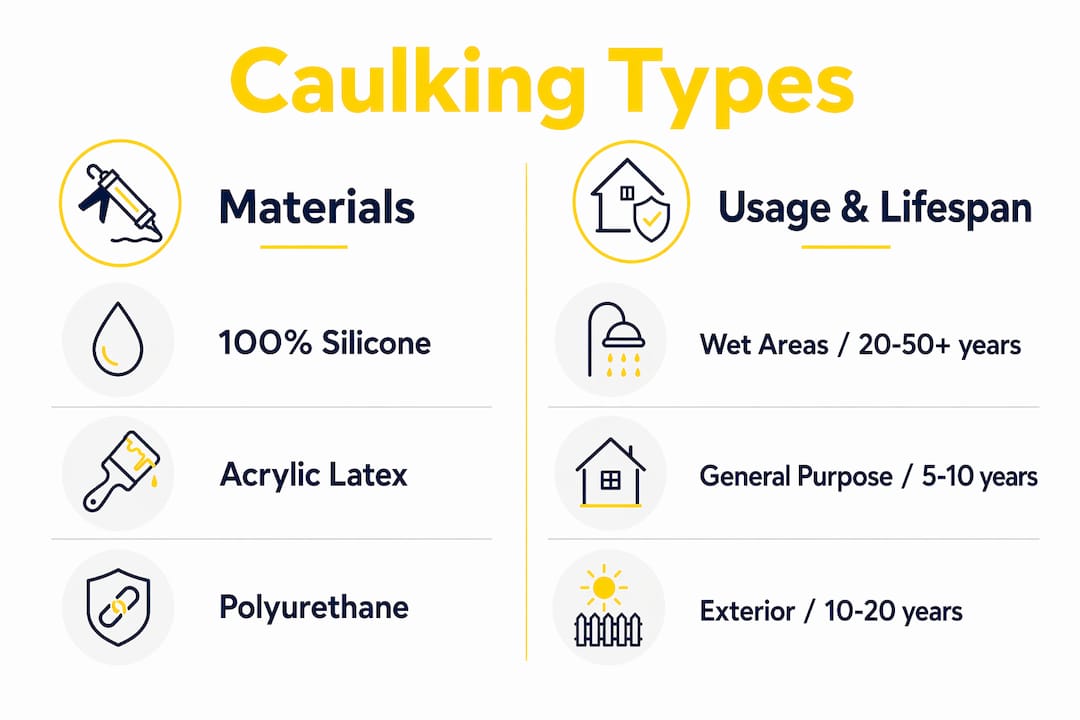
For areas that will be painted, siliconized acrylic is a practical choice. It bonds well, accepts paint, and handles moderate movement. Elastomeric sealants are the right call for exterior joints and areas subject to significant thermal movement, which matters a great deal in Ontario where freeze-thaw cycles are hard on building envelopes.
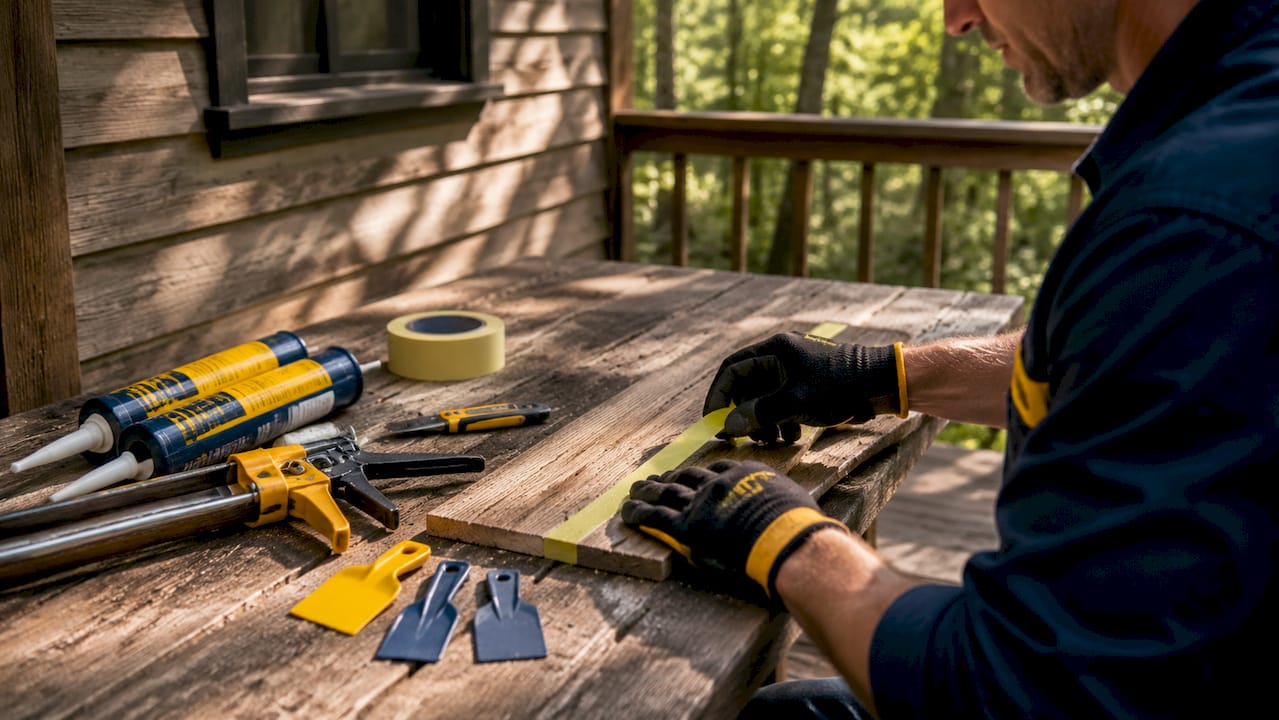
Beyond the caulk itself, you need the right supporting supplies:
- Caulk gun: A smooth-rod gun with a pressure release gives you consistent bead control.
- Utility knife and oscillating tool: For cutting and removing old sealant cleanly.
- Plastic scraper and stiff-bristle brush: For clearing residue without scratching surfaces.
- Isopropyl alcohol or acetone: For degreasing surfaces before application.
- Backer rod: Backer rod diameter should be 1.25 times the joint width to prevent three-sided adhesion and improve sealant flexibility.
- Smoothing tools or a wet finger: For tooling the bead before it skins over.
- Painter’s tape: For clean, straight lines in visible areas.
If you manage multiple units, bulk purchasing caulking supplies can reduce costs by 30–50%. Keeping a stocked supply kit on hand means you are never waiting on materials when a unit turns over.
| Material | Best Use | Typical Lifespan |
|---|---|---|
| 100% Silicone | Bathrooms, kitchens, wet areas | 20–50+ years |
| Siliconized Acrylic | Paintable interior joints | 5–10 years |
| Elastomeric Sealant | Exterior joints, building envelope | 10–20+ years |
| Acrylic Latex | Low-movement interior trim | 1–2 years |
When is the best time to schedule caulking repairs at tenant turnover?
Timing is straightforward once you build it into your process. The turnover window within 2–3 days of vacancy is the right time to complete re-caulking, so the unit is ready before new tenants arrive. Waiting longer risks moisture getting into open joints, especially in bathrooms where grout and tile edges are exposed.
Outside of turnovers, a structured annual inspection catches problems before they become expensive. Here is a practical checklist approach for inspecting high-risk areas:
- Bathrooms: Check tub and shower surrounds, the joint between the tub deck and wall tile, around the toilet base, and under the vanity where pipes penetrate the cabinet floor.
- Kitchens: Inspect the joint between the countertop and backsplash, around the sink cutout, and along the base of the cabinets where they meet the floor.
- Windows and doors: Look for cracking, shrinkage, or separation at the frame-to-wall joint on both interior and exterior sides.
- Exterior penetrations: Check around dryer vents, electrical boxes, hose bibs, and any other points where pipes or conduits pass through the building envelope.
- Expansion joints: Confirm sealant is intact and flexible, not cracked or compressed flat.
In Ontario, the best time of year to do exterior caulking is late spring through early autumn, when temperatures are consistently above 4°C. Applying sealant in cold weather causes it to cure improperly and fail early. Plan your exterior work around the season, and schedule interior repairs at any turnover regardless of time of year.
How do you properly execute caulking repairs step by step?
Surface preparation accounts for 80% of sealant success, and that is not an exaggeration. Skipping prep is the single biggest reason caulk fails early. Follow these steps in order every time.
-
Remove all old caulk. Use a utility knife to score along both edges of the existing bead. An oscillating tool speeds this up significantly on longer runs. Pull out the bulk of the old material, then use a plastic scraper to clear residue without gouging the substrate. For silicone residue, a silicone remover product like DAP’s caulk remover or Goo Gone Pro-Power works well.
-
Clean and degrease the surface. Wipe down the joint with isopropyl alcohol or acetone on a clean cloth. This removes soap scum, body oils, cleaning product residue, and any remaining adhesive. Let the surface dry completely. Applying caulk to a damp surface is one of the most common causes of adhesion failure.
-
Install backer rod where needed. For joints wider than 6 mm, press backer rod into the gap before caulking. This controls the depth of the sealant bead and prevents three-sided adhesion, which causes tearing. The ideal sealant depth is half the joint width, so a 12 mm wide joint should have a 6 mm deep bead.
-
Apply painter’s tape. For visible areas, tape both sides of the joint to keep lines clean. This takes a few extra minutes but produces a professional result.
-
Cut the nozzle and load the gun. Cut the nozzle at a 45-degree angle, with the opening sized to match the joint width. Load the cartridge and purge any air before starting.
-
Apply in small sections. Experienced technicians apply and tool caulk in small manageable sections before skinning occurs. Work in 300–600 mm runs, then immediately smooth the bead with a wet finger or smoothing tool. Do not let the bead sit more than a minute or two before tooling.
-
Remove tape and allow to cure. Pull tape while the caulk is still wet for clean edges. Curing requires at least 8 hours before water exposure, and full performance takes about 24 hours. Communicate this to your cleaning crew so they do not wet the area prematurely.
Pro Tip: Apply a light mist of water to the joint before smoothing silicone. It prevents the sealant from sticking to your finger or tool and produces a cleaner, more consistent bead.
For a deeper look at identifying caulking deficiencies during a site walkthrough, Kettlecontracting has a detailed guide that covers what to look for room by room.
What common mistakes should property managers avoid?
Most caulking failures come from improper application, not from product quality. Knowing what not to do saves you time and money on repeat repairs.
- Caulking over old caulk. This is the most common mistake. Old sealant is often contaminated, cracked, or no longer bonded. Adding a new layer on top does not fix the underlying failure. You can read more about when to replace versus repair to make the right call on each joint.
- Using the wrong caulk type. Acrylic latex in a shower surround will fail within months. Silicone where paint adhesion is needed creates its own problems. Match the product to the substrate and environment every time.
- Applying in direct sun or extreme temperatures. Caulk applied in direct sun or on hot surfaces fails quickly due to thermal expansion mismatches. The optimal application temperature is 4°C to 27°C. In Ontario summers, schedule exterior work for early morning.
- Ignoring joint dimensions. A bead that is too deep will tear under movement. A bead that is too shallow will not seal properly. Depth ratios matter, and backer rod is the tool that controls them.
- Skipping functional defects in favour of cosmetic ones. Property managers should prioritise fixing water intrusion signs over purely aesthetic issues. A hairline crack in a visible bead is less urgent than a gap behind a toilet where moisture is getting into the subfloor.
Pro Tip: Keep a small inspection kit in your turnover bag: a flashlight, a thin metal probe, and a notepad. Probe suspect joints rather than just looking at them. A bead that looks intact can be hollow or unbonded underneath.
How does proper caulking protect your investment and reduce long-term costs?
Caulking is one of the lowest-cost maintenance tasks with one of the highest returns. Here is what you protect when you keep caulking in good repair:
- Structural integrity: Water that gets behind tile or into wall cavities causes rot, mould, and framing damage. Repairs at that stage cost thousands, not hundreds.
- Tenant satisfaction: Visible mould, water stains, and peeling surfaces generate complaints and drive turnover. Good caulking prevents the conditions that cause those problems.
- Energy efficiency: Gaps at windows, doors, and penetrations allow conditioned air to escape. Sealing them reduces heating and cooling costs, which matters to tenants paying their own utilities. Kettlecontracting’s energy efficiency upgrades resource covers this in more detail.
- Fixture lifespan: Water that works its way under a countertop or around a window frame degrades the substrate. Proper sealing extends the life of these components significantly.
- Regulatory compliance: Many municipalities and building codes require maintained sealant at certain joints. Keeping up with repairs supports compliance during inspections.
Coordinating caulking with other turnover tasks, like lease turnover vent cleaning, makes the process more efficient and keeps the unit in top condition for incoming tenants.
Key takeaways
Effective caulking repairs between tenants require proper timing, thorough surface preparation, and the right sealant for each application to deliver lasting results.
| Point | Details |
|---|---|
| Time repairs at turnover | Complete re-caulking within 2–3 days of vacancy to protect the unit before new tenants arrive. |
| Surface prep is non-negotiable | Remove all old caulk and degrease surfaces thoroughly, since 80% of sealant success depends on prep. |
| Match caulk to the application | Use 100% silicone for wet areas, siliconized acrylic for paintable joints, and elastomeric for exterior use. |
| Avoid the most common mistake | Never apply caulk over old caulk. Strip it completely or the new bead will fail along with the old one. |
| Bulk purchasing saves money | Stocking supplies in advance can reduce per-unit caulking costs by 30–50% across a portfolio. |
What i have learned after 25 years of caulking rental properties
After two and a half decades working on properties across Ontario, the one thing I keep coming back to is this: speed is the enemy of a good caulking job. Property managers are under pressure to turn units fast, and I understand that. But rushing through prep to save an hour almost always creates a callback within six months.
The jobs that hold up for years are the ones where someone took the time to strip the old sealant completely, dry the surface properly, and apply the right product for the conditions. I have seen silicone joints in bathrooms that were still performing after 15 years because the prep was done right. I have also seen brand-new caulk peel off a tub surround in three weeks because it was applied over a damp, contaminated surface.
Ontario’s climate adds another layer of complexity. The freeze-thaw cycles we get from november through march put real stress on exterior joints. Elastomeric sealants are not optional on building envelopes here. They are the only product that handles that kind of movement without cracking.
My honest advice: build caulking into your turnover checklist as a non-negotiable step, not an afterthought. Budget for quality materials. And if a joint is in bad shape or the substrate is damaged, call in a professional rather than patching over a problem that will only get worse.
— Felix
How Kettlecontracting supports property managers with caulking repairs
Kettlecontracting works with property managers and landlords across the Greater Toronto Area who need reliable, professional-grade caulking done right the first time. Whether you manage a single rental unit or a multi-building portfolio, having a trusted specialist handle your turnover caulking means the work is done to a standard that holds up through Ontario’s seasons.

Start with our detailed guide on preparing windows for caulking, which walks through surface prep, material selection, and application techniques specific to window and door frames. If you are dealing with recurring failures or suspect a construction defect, our caulking defect examples resource helps you identify what you are looking at before deciding on a repair approach. Reach out to Kettlecontracting directly when you need a professional assessment or want the job done to a standard that protects your investment long term.
FAQ
How often should caulking be replaced in a rental unit?
Inspect caulking at every tenant turnover and replace any cracked, shrinking, or unbonded sections. High-traffic wet areas like bathrooms and kitchens typically need attention every 2–5 years depending on the product used.
Can you apply new caulk over old caulk in a rental property?
No. Applying new caulk over old sealant is one of the leading causes of premature failure. Remove all old material and clean the surface before applying fresh caulk for a bond that lasts.
What type of caulk is best for bathroom repairs between tenants?
100% silicone sealant is the correct choice for bathroom wet areas. It resists mould, handles constant moisture exposure, and can last 20–50+ years when applied to a properly prepared surface.
What temperature is safe for applying caulk in ontario?
The safe application range is 4°C to 27°C. Avoid applying caulk in direct sun or on surfaces that are very hot, as thermal expansion causes the sealant to fail before it cures properly.
How long before a tenant can use a bathroom after caulking?
Wait at least 8 hours before any water exposure, and allow a full 24 hours for complete curing. Communicate this timeline to your cleaning crew and incoming tenants to avoid premature adhesion failure.