
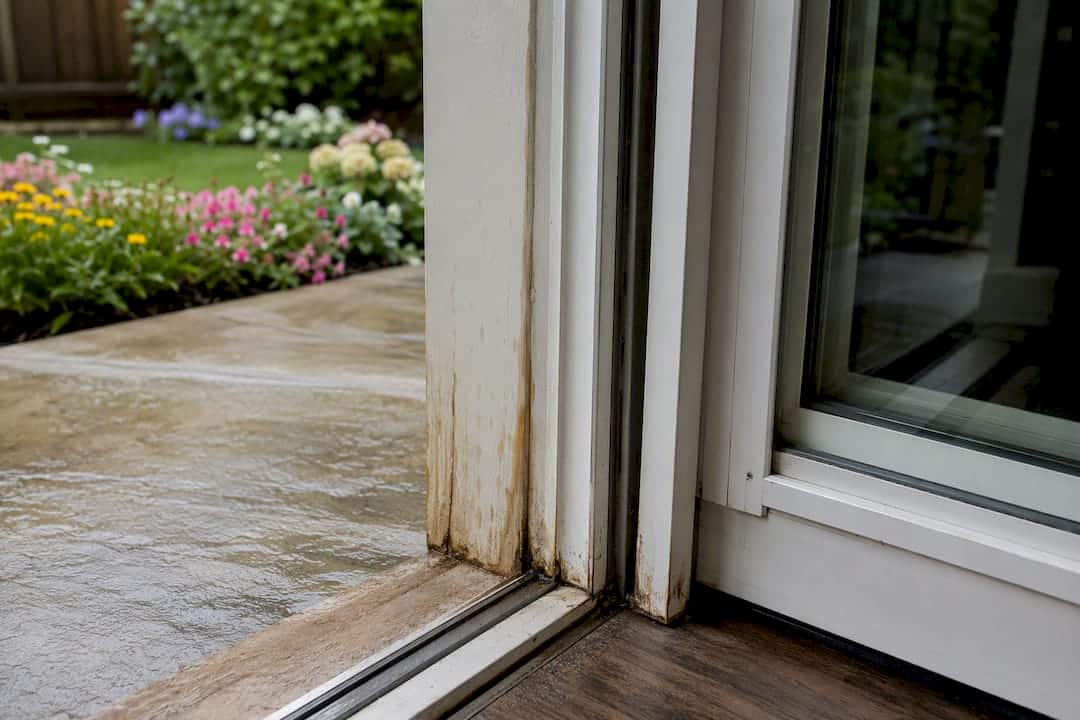
Most patio door leaks come from one of four places: blocked weep holes, worn weatherstripping, failed exterior caulking or flashing, or bad grading and gutters dumping water at your threshold. Before you touch anything, run a hose test. Have someone spray the exterior of the door for a few minutes while you watch the interior track and sill for water. Check the track for standing water at the same time. That single test tells you almost everything about where to look next.
- Blocked weep holes or track drainage — water pools inside the sill instead of draining outside
- Worn weatherstripping — gaps let wind driven rain past the seal
- Failed exterior caulking or flashing — water gets in behind the frame, not through it
- Bad patio grading or clogged gutters — water is pushed toward the door from outside
Most weep hole and weatherstripping problems are fair game for a capable homeowner. Anything involving flashing, a sill pan, or a warped frame usually means pulling the door, and that’s a job for a contractor.
Table of Contents
- Sliding door leaking at bottom: 6 common causes and quick checks
- How to diagnose a patio door leak step by step
- DIY fixes that solve most patio door leaks
- When to call a professional for patio door leak repair
- Keep your patio door leak-free: a simple maintenance schedule
- What 25 years of caulking in Oshawa teaches you about patio doors
- How to identify and repair door frame warping or damage causing leaks
- Interior water damage: what to check and how to remediate it
- Fix the leak, then protect the fix
- Why the internet’s patio door advice stops halfway
- Get a proper fix for your leaking patio door
- Sources
- FAQ
Sliding door leaking at bottom: 6 common causes and quick checks
Before you call anyone, work through this list in order. It’s the same sequence I’d run on a service call, and it usually finds the problem in under fifteen minutes.
- Clogged weep holes. These small openings sit along the exterior base of the frame and are designed to drain water that collects in the sill. Pour a cup of water into the track. If it doesn’t drain out within a minute or two, they’re blocked.
- Weatherstripping failures. Slide a dollar bill along the seal where the panel meets the frame. If it pulls through with no resistance, or you can see daylight with a flashlight from outside at night, the seal is done.
- Track and roller problems. Lift the sliding panel slightly while it’s closed. Excess play, grinding, or a panel that drags instead of glides usually points to flat-spotted or seized rollers.
- Flashing and caulking failures. If the track is bone dry but you’re seeing stains on interior trim or drywall near the header or jamb, water is getting in behind the frame, not through the sill.
- Patio grading and gutter issues. Stand outside during a rain event and watch where the water goes. If it’s pooling against the threshold or a gutter is overflowing directly above the door, that’s your source.
- Sill pan or structural damage. Soft subfloor, visible rot, or a frame that no longer sits square usually signals a failed sill pan, which is not a caulk-and-done fix.
Weep hole blockages are the single most common cause of a sliding door leaking at the bottom, ahead of misaligned rollers, worn track, and frame seal failures, in that order. That’s good news, because it’s also the easiest one to fix yourself.
How to diagnose a patio door leak step by step
Diagnosing a leak properly means slowing down and working through it methodically, not just caulking the first gap you see. I’ve watched plenty of homeowners reseal a door twice before finding out the real leak was six inches away, behind the frame.
-
Document the pattern while it’s dry. Note exactly where water shows up after a storm: track only, base of the drywall, subfloor near the threshold. Take photos. This record matters if you end up calling a contractor later.
-
Run the hose test in sequence. Start low at the sill and let it run for two or three minutes before moving up to the jambs, then the head of the frame. Watch the interior the whole time. Water appearing right away at the sill points to weep or track drainage. Water that shows up only after you hit the upper jamb or head usually means a seal or flashing failure higher up.
-
Locate and test the weep holes. They’re usually small slots or round holes along the bottom exterior track, sometimes hidden behind a plastic cover you can pop off with a flat screwdriver. Andersen’s own maintenance guidance confirms weep systems need to drain freely and should be cleaned as routine upkeep, not just when there’s a problem. Pour water directly into the sill track near each weep and confirm it exits outside within a minute or two.
-
Inspect the track and rollers. With the door closed, grab the handle and lift gently. More than a small amount of play means worn rollers. Look for flat spots, rust, or debris packed into the track itself, since a track full of grit can hold water just as effectively as a clogged weep hole.
-
Recognize a behind-frame leak. If the track stays completely dry through the entire hose test but you still see interior staining, the water isn’t coming through the sill system at all. It’s getting in around the frame itself, usually through failed caulking or damaged flashing. This is a different repair entirely, and it’s worth reading through signs of failed window caulking if you’re seeing this pattern, because the same failure mode shows up around window units.
Pro Tip: Run the hose test on a mild, calm day, not during an actual storm. Wind driven rain changes where water lands on the frame, and it’ll send you chasing the wrong spot.
DIY fixes that solve most patio door leaks
A good chunk of leaking patio door repair work doesn’t need a contractor. Here’s what you can realistically tackle yourself, and where I’d draw the line.
- Clear the weep holes properly. Use a pipe cleaner, a thin wire, or a small crevice tool to gently work through each opening. Andersen recommends cleaning weep holes at least every three months, more often if you’re near a construction site, a farm field, or the lake. A shot of compressed air afterward clears out finer debris. Pour water in afterward to confirm it drains — this simple technique is explained in detail in How to spot the source of a roof leak at home for identifying drainage issues that might cause water to back up and leak at your patio door threshold.
- Replace worn weatherstripping. Figure out whether yours is a pile seal (looks like a brush strip), a bulb seal (a hollow rubber tube), or a fin seal, then buy the matching replacement rather than guessing. Adhesive-backed strips bond best in moderate temperatures, roughly 15°C to 24°C. Installing new weatherstripping outdoors in January is asking for a seal that never actually bonds.
- Adjust or replace rollers. Most sliding panels have adjustment screws near the bottom corners that raise or lower the panel slightly to fix dragging or gaps. If the rollers themselves are flat-spotted or rusted, replace them rather than adjusting around the problem. Use a dry Teflon lubricant on the rollers only. Skip anything oil-based or petroleum-based in the track, since thick lubricants just collect grit and make things worse.
- Reseal small exterior gaps. Silicone caulk handles movement and moisture well around the frame perimeter; polyurethane bonds better to certain masonry and wood substrates. Either way, treat a fresh bead of caulk as a fix for a small, well-understood gap, not a patch over a leak you haven’t actually diagnosed. If you found staining with a dry track during your hose test, caulk alone won’t solve it.
- Manage the situation temporarily. A towel or absorbent mat at the base of the door and a simple door dam can buy you time while you sort out parts or book a contractor. Keep an eye on the subfloor underneath. Hidden moisture there is worse than what you can see.
Pro Tip: If you’ve cleared the weeps, swapped the seal, and adjusted the rollers and it’s still leaking, stop reaching for more caulk. That’s usually your sign the problem is behind the frame.
When to call a professional for patio door leak repair
Some signs mean it’s time to stop troubleshooting and pick up the phone.
- The leak persists after you’ve cleared weeps, replaced seals, and adjusted rollers
- You see rot, soft wood, or a soft subfloor near the threshold
- The hose test shows a dry track but ongoing interior staining, pointing to a failed sill pan or flashing
- The door won’t sit square in its frame anymore
A proper professional inspection typically means removing the door panel and sometimes the entire frame to check the sill pan and flashing underneath, replacing failed caulking around the full perimeter, and assessing the subfloor for hidden damage. Removing the unit changes both the cost and the timeline compared to a surface reseal, which is exactly why some contractors quote a quick caulk job when the real fix needs more. Before you call, gather your hose test notes, photos of any staining, and the door’s approximate age. Ask the contractor directly whether the repair involves removing the unit, and what they expect to find once it’s out.
Keep your patio door leak-free: a simple maintenance schedule
A patio door isn’t a set-it-and-forget-it component. It needs a little seasonal attention, and most of it takes fifteen minutes.
- Every three months: Clean the weep holes and vacuum debris out of the track. Increase this in high-debris areas near trees, construction, or gravel roads.
- Once a year: Check weatherstripping for compression, cracking, or gaps; inspect exterior caulking around the frame perimeter; clear gutters above the door; and check that the patio surface still slopes away from the threshold.
- Watch your adhesive window. Any weatherstrip or caulk work goes on best between roughly 15°C and 24°C. A repair done in a February cold snap is a repair you’ll likely be redoing by spring.
- Consider long-term upgrades. Correct flashing and a proper sill pan, improved exterior drainage or regrading, and higher-performance weatherstripping all pay off in Ontario’s freeze-thaw climate, where cheap seals fail faster than almost anywhere else.
A short seasonal routine like this prevents most of the repairs homeowners end up calling contractors for, and it’s a lot cheaper than replacing subflooring.
What 25 years of caulking in Oshawa teaches you about patio doors
I’ve reflashed more patio doors than I can count, and the pattern is always the same: the visible leak is rarely the actual failure point. Correct flashing and caulking direct water away from the sheathing and subfloor before it ever gets a chance to sit and soak in. Get that wrong, and you’re not dealing with a drip, you’re dealing with rot behind drywall you won’t see for a year.
- Kettle Contracting has spent 25 years on residential and commercial building envelopes across the Greater Toronto Area
- We’ve handled everything from single-door resurfaces to full commercial envelope re-caulking
- A quick bead of caulk over a visible gap is fine as a stopgap, never as the actual fix for a flashing failure
A dry track with wet drywall almost always means the water’s getting in behind the frame, not through it. No amount of surface caulking fixes that. You have to get behind the frame and correct the flashing, or you’re just buying time.
— Felix
How to identify and repair door frame warping or damage causing leaks
A warped frame usually shows up as a door that suddenly drags, won’t latch flush, or leaves a visible gap at one corner while sitting tight at another. Run a straightedge along the vertical jamb; a gap or bow of more than a few millimetres is a sign the frame has shifted. Warping often comes from prolonged moisture exposure, meaning the leak caused the damage, not the other way around, which is why fixing the drainage or flashing issue matters as much as the frame repair itself.
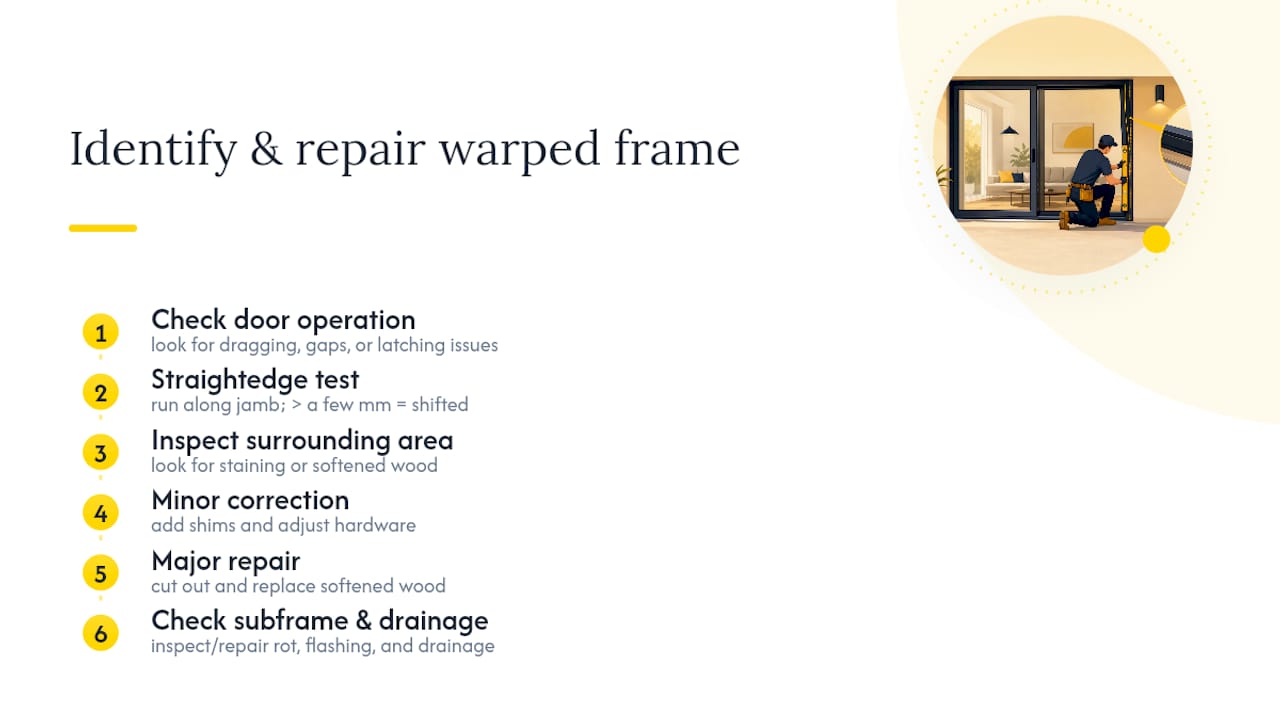
Minor warping in wood frames can sometimes be corrected with shims and hardware adjustment, but if the wood has softened or you can press a screwdriver into it without resistance, that section needs to be cut out and replaced. Aluminum and vinyl frames rarely warp from moisture directly, but they can shift if the surrounding wood buck or subframe has rotted underneath them. In either case, a warped frame paired with any staining or softness nearby is a strong signal you’re looking at a job that needs the unit removed, not a caulk touch-up. Trying to caulk around a warped frame just seals in moisture that’s already there.
Interior water damage: what to check and how to remediate it
Water that gets past a patio door doesn’t stop at the sill. Check the subfloor immediately around the threshold for softness, discoloration, or a slight give underfoot, and look up at the drywall or trim above and beside the door for staining, bubbling paint, or a musty smell. These are the tells that water has been getting in longer than you realized.
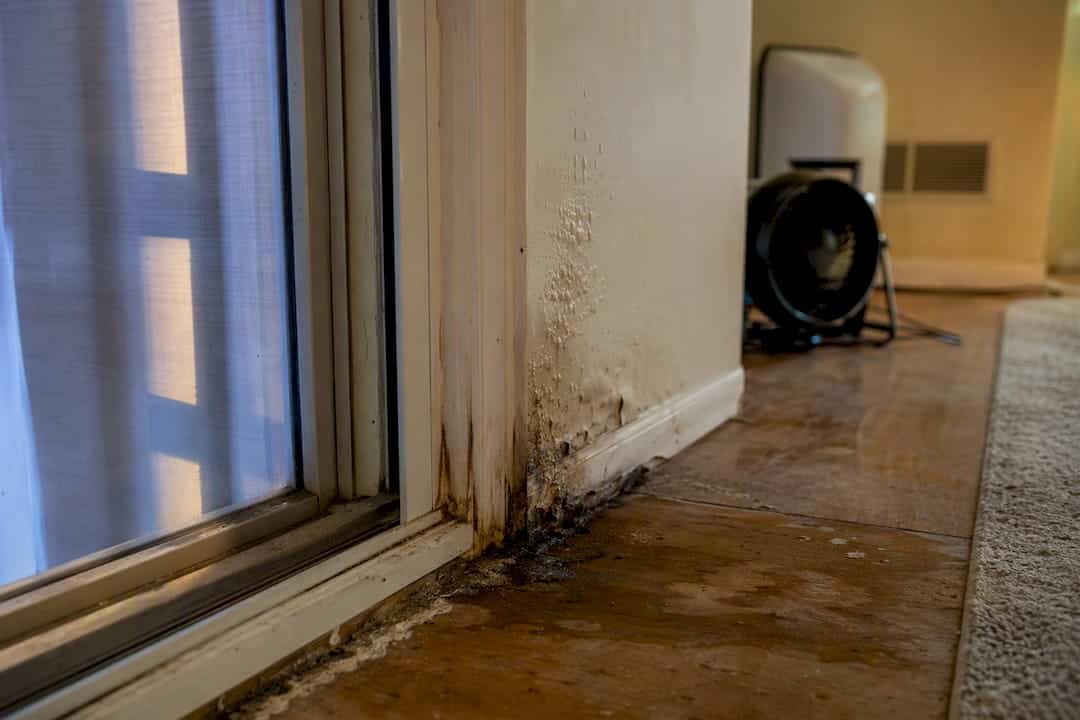
Start remediation by drying the area thoroughly with fans or a dehumidifier, and pull back any flooring or trim that’s visibly saturated rather than painting over it. Mould can start developing within 24 to 48 hours in damp material, so speed matters more than tidiness at this stage. Once everything is dry, assess whether subfloor sections need replacing before you address the door itself. Fixing the leak source and skipping this step just means sealing moisture damage behind new drywall, where it keeps causing problems out of sight.
Fix the leak, then protect the fix
The most reliable patio door leak repairs start with a hose test to locate the true entry point, then address weeps, seals, or flashing based on what that test reveals.
| Point | Details |
|---|---|
| Run the hose test first | Spray low, then move up the frame, watching the interior track for exactly where water appears. |
| Clean weep holes quarterly | A pipe cleaner or wire and a quick water test catch most blockages before they cause pooling. |
| Dry track with interior stains means flashing | This pattern signals a behind-frame leak that caulk alone will not fix. |
| Match adhesive work to temperature | Install weatherstripping between roughly 15°C and 24°C for a bond that actually holds. |
| Call Kettlecontracting for flashing and sill work | Kettlecontracting handles door removal, re-flashing, and full caulking repairs for lasting fixes. |
Why the internet’s patio door advice stops halfway
Most patio door leak advice online covers the easy half: clean the weeps, swap the seal, done. That’s true as far as it goes, and it fixes the majority of cases. What gets skipped is the harder truth: if the track is dry and you’re still seeing stains, no amount of homeowner troubleshooting fixes that, because the problem is physically behind the frame.
The conventional wisdom oversells caulk as a universal patch. It’s not. A bead of sealant over a symptom, without correcting the flashing underneath, just buys you a season, maybe two, before it fails again, usually worse. In a climate that swings through freeze-thaw cycles every winter, that gap between “looks fixed” and “actually fixed” gets exposed fast.
My honest priority order for readers: run the hose test before spending a dollar on parts, fix what’s genuinely DIY (weeps, seals, rollers), and treat any dry-track leak as a flashing problem that needs a trade, not a caulk gun.
Get a proper fix for your leaking patio door
If you’ve worked through the hose test and the weep hole cleaning and you’re still finding water where it shouldn’t be, that’s exactly the point where Kettle Contracting takes over from the caulk gun in your garage. We handle the part of the job that requires pulling the door, correcting the flashing, and rebuilding the seal system properly, so you’re not redoing the same repair every spring thaw.

We serve homeowners, property managers, and commercial building owners across the Greater Toronto Area, and patio door and window leaks are a regular part of our workload alongside full building envelope caulking. If your leak points to a sill pan or flashing failure, read through how caulking protects entryways from flooding and then reach out for an inspection. We’ll tell you honestly whether you’re looking at a reseal or a full flashing correction, and quote it accordingly.
Sources
- Clean weep holes on Andersen windows or patio doors
- How to clean weep holes in sliding glass doors — Panda Windows
- Drafty patio door? Weatherstripping stops drafts cold — Family Handyman
FAQ
Why does my patio door leak when it rains?
Rain typically gets in through blocked weep holes that can’t drain the sill, worn weatherstripping that lets wind driven rain past the seal, or failed caulking and flashing behind the frame.
What are the possible reasons my sliding glass door is leaking?
The most common causes, in order, are clogged weep holes, misaligned rollers or worn track, damaged weatherstripping, failed flashing, and patio grading or gutters directing water toward the threshold.
Where are the weep holes on my sliding glass door?
They’re small slots or holes along the exterior base of the door track, sometimes hidden behind a snap-off plastic cover, and they’re designed to drain water out of the sill system.
Can sliding glass doors be resealed?
Yes, small exterior gaps can be resealed with silicone or polyurethane caulk, but if a hose test shows a dry track with interior staining, the leak is behind the frame and needs flashing repair, not just a fresh bead of caulk.
Recommended
- How to Seal a Door From Rain | Expert Tips to Stop Leaks Fast – Kettle Contracting
- Can Caulking Frame Rot Prevent? | Door Frame Protection Tips 1
- Can Caulking Fix Window Leaks? | Fast Solutions for a Dripping Dilemma – Kettle Contracting
- How to Spot Bad Door Caulking | Warning Signs from the Pros – Kettle Contracting
