A small crack in your window caulking might not seem urgent, but left unchecked, it can quietly let moisture seep behind your walls, feed mould growth, and push your heating and cooling costs higher every month. For homeowners and property managers across the Greater Toronto Area, where temperatures swing dramatically between seasons, that kind of slow damage adds up fast. This guide walks you through exactly how to identify failing window caulking, inspect it properly, avoid common diagnostic errors, and understand what causes it to break down in the first place.
Table of Contents
- Why failed caulking is a serious issue
- Common signs your window caulking has failed
- How to inspect window caulking like a pro
- Common diagnostic mistakes and how to avoid them
- What causes window caulking to fail?
- Our take: how to think like a pro when identifying window caulking issues
- Next steps to safeguard your home’s windows
- Frequently asked questions
Key Takeaways
| Point | Details |
|---|---|
| Look for visible damage | Cracks, peeling, or missing caulking signal a failed seal. |
| Don’t block drainage paths | Never seal over window weep holes to prevent trapped water. |
| Inspect in all seasons | Check around your windows in spring and fall—weather extremes speed up caulking failure. |
| Be systematic | Combine exterior inspections with interior checks and trace water stains carefully. |
| Proactive repair saves money | Early action on failed caulking prevents damage and improves energy efficiency. |
Why failed caulking is a serious issue
Window caulking does one essential job: it seals the gap between your window frame and the surrounding wall. When it works, it keeps water out and conditioned air in. When it fails, both of those protections disappear, often without any obvious warning.
The trouble is that the consequences rarely appear all at once. Moisture can enter through a tiny gap, travel along your wall sheathing, and only show up as a water stain or warped drywall weeks later. By then, the damage is already done. The connection between window caulking and insulation is direct: a failed seal means your furnace or air conditioner works harder to compensate for the air leaking in or out.
Here is what failed caulking puts at risk:
- Structural integrity: Repeated moisture exposure can rot wood framing and degrade wall assemblies over time.
- Indoor air quality: Damp conditions behind walls are a primary cause of mould growth, which can affect your family’s health.
- Energy efficiency: Air leakage through failed seals forces your HVAC system to work harder, raising utility bills.
- Finished surfaces: Water stains, peeling paint, and warped trim are common downstream effects of caulking failure.
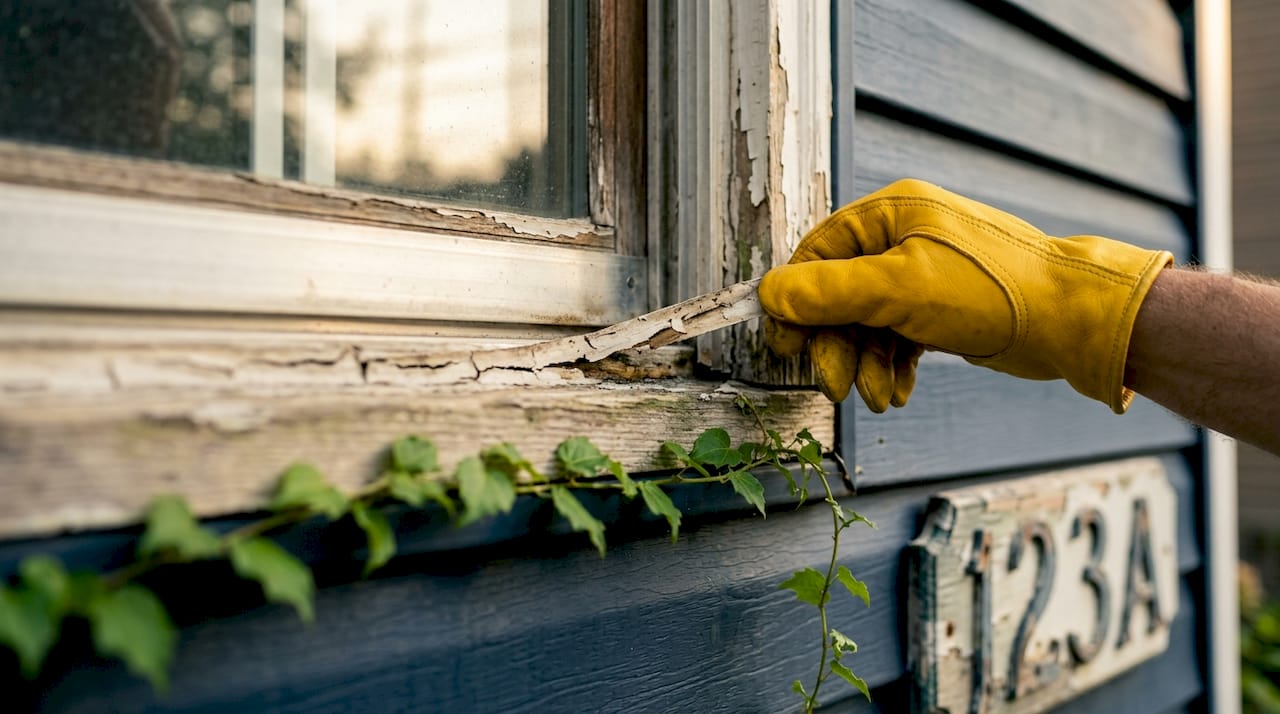
Failed window caulking typically shows up as cracking, shrinkage, or peeling that pulls away from surfaces, or missing chunks of sealant. These are not just cosmetic issues; they signal that the seal is no longer doing its job.
The good news is that early identification keeps repairs simple and affordable. Water leaks and drafts around windows are reliable early indicators that your perimeter sealant is compromised. Catching them before they escalate is always the better outcome.
Common signs your window caulking has failed
Knowing what to look for is the first step. Some signs are obvious; others require a closer look. Here is a breakdown of what to watch for, both visually and physically.
Visible signs of failure:
- Cracks running along the caulk bead, including fine hairline cracks that are easy to miss
- Shrinkage gaps where the caulk has pulled away from the window frame or surrounding wall
- Peeling or flaking sections where the caulk no longer adheres to the substrate
- Missing chunks or crumbled areas where the material has broken down entirely
- Discolouration or dark staining along the caulk line, which can indicate moisture has already entered
Less obvious signs to look for indoors:
- Drafts near the window, especially on windy days or during winter
- Water stains or tide marks on the interior wall or windowsill
- Mould or mildew growth around the window frame or on adjacent drywall
- Paint that is bubbling or peeling near the window perimeter
Visible defects such as cracking, shrinkage gaps, and missing sections are clear signals that the caulk no longer provides a watertight or airtight seal.
| Sign | Location | What it indicates |
|---|---|---|
| Cracking or hairline cracks | Along the caulk bead | Material has become brittle |
| Shrinkage gap | Between caulk and frame | Loss of adhesion or flexibility |
| Water stains | Interior sill or wall | Moisture has already entered |
| Mould near frame | Interior corners | Ongoing moisture accumulation |
| Peeling paint | Around window perimeter | Water trapped beneath surface |
| Cold drafts | Around window edges | Air leakage through failed seal |
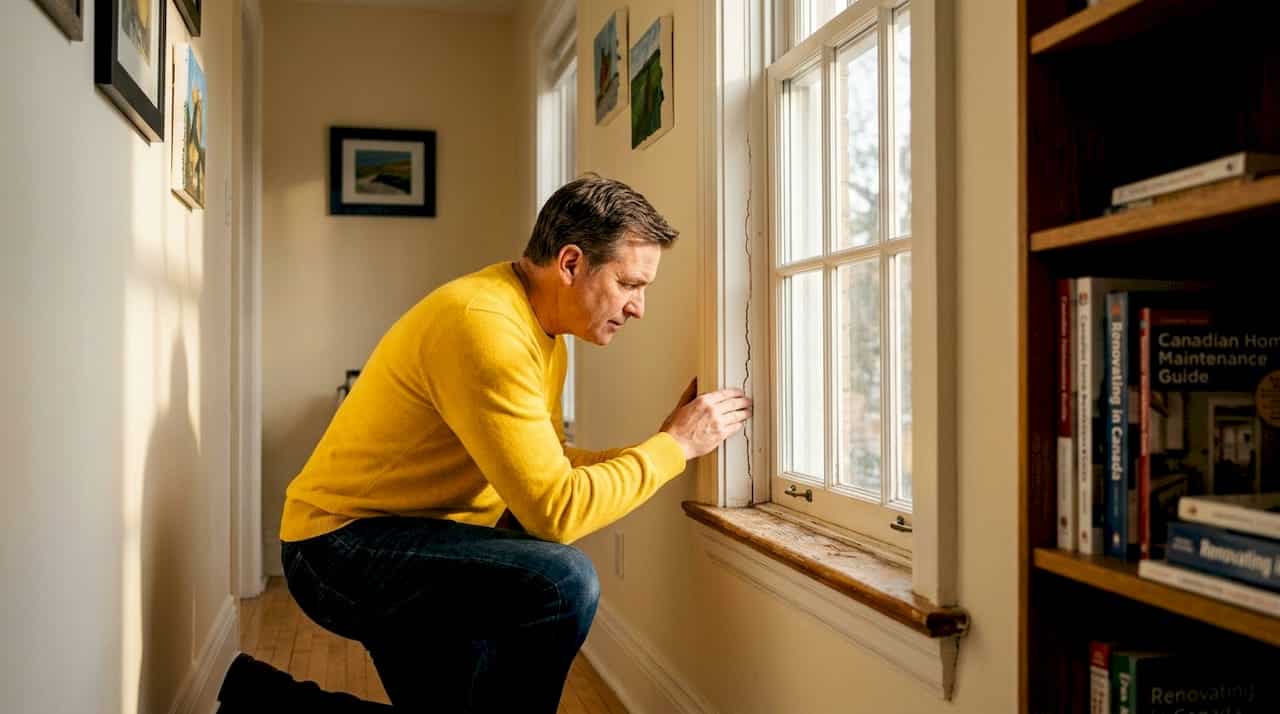
Pro Tip: Run your finger slowly along the entire caulk bead. A healthy bead feels firm but slightly flexible and stays flush with both surfaces. If it feels hard and brittle, crumbles under light pressure, or lifts away from the frame, it needs attention. This tactile check takes less than a minute and catches issues that are invisible to the eye.
How to inspect window caulking like a pro
A thorough inspection does not require special tools. What it does require is a systematic approach, both inside and outside your home, and ideally at the right time of year.
Follow these steps for a complete window caulking inspection:
-
Choose the right timing. The best season for caulking inspections is late spring or early fall, when temperatures are moderate and you can clearly see seasonal wear. Inspecting after a heavy rainfall is also valuable for spotting active leaks.
-
Start with the exterior. Stand back and look at each window from a slight angle. Raking light, whether from the sun or a flashlight, reveals gaps and depressions in the caulk bead that are hard to see straight on. Work your way around every window, checking all four sides.
-
Get close and check adhesion. Move in and press gently along the bead with your finger. Look for areas where the caulk has separated from the frame or the wall surface. Pay particular attention to corners, where caulk tends to fail first due to movement stress.
-
Inspect the interior. Check the inside perimeter of each window for staining, mould, or paint issues. On a windy day, hold a piece of tissue near the frame to detect air movement.
-
Check after rainfall. A systematic approach includes exterior observation during and after rain and interior inspection if staining is significant. Rain testing is one of the most reliable ways to confirm an active leak.
-
Document what you find. Take photos of any problem areas. Dated photos give you a reference point for how quickly deterioration is progressing.
Periodic window inspections are recommended at the start of warm and cool weather, with exterior checks for evidence of leaks or gaps. Scheduling two inspections per year, one in spring and one in fall, catches most issues before they become expensive problems.
| Inspection stage | What to check | Tools needed |
|---|---|---|
| Exterior visual | Cracks, gaps, peeling, discolouration | Flashlight, ladder |
| Exterior tactile | Adhesion, flexibility, separation | Your fingers |
| Interior visual | Stains, mould, paint damage | Flashlight |
| Interior draft test | Air leakage around frame | Tissue or candle |
| Post-rain check | Active leaks, damp spots | None |
Before you inspect, reviewing a solid window prep checklist helps you understand what a properly sealed window should look like, making it easier to spot deviations.
Pro Tip: Shine a flashlight at a low angle along the caulk bead, parallel to the surface rather than directly at it. This raking light technique casts shadows across small cracks and gaps that would otherwise be invisible in normal lighting.
Common diagnostic mistakes and how to avoid them
Even a careful inspection can lead you in the wrong direction if you do not know what to watch out for. These are the most frequent errors homeowners make when diagnosing window caulking problems.
Sealing over weep holes
Weep holes are small openings at the bottom of window frames designed to drain any water that gets past the outer seal. They are a critical part of how windows manage moisture. Weep holes should not be caulked; blocking them can worsen water problems even when the caulk joints look sealed. If you see small slots or holes along the bottom of your window frame, leave them open.
Confusing perimeter failure with glass unit failure
Not all window moisture problems come from failed caulking. If you see foggy or hazy glass between the panes of a double or triple-glazed window, that is a failed insulated glass unit seal, not a caulking problem. Replacing the caulk will not fix it. Perimeter caulking failure shows up as drafts, water at the frame, or staining on the wall. Knowing the difference saves you from unnecessary work. For more on avoiding this and other errors, the window caulking dos and don’ts guide is a practical reference.
Misreading where water enters
This is perhaps the most frustrating diagnostic challenge. Water entering through a failed caulk joint does not necessarily appear immediately indoors and may travel along flashing or wall sheathing before showing interior signs. A water stain on your living room wall might originate from a caulk failure two or three feet away from where the stain appears. Always trace water back to its source by checking the exterior, not just the interior.
Misdiagnosis is common because water is unpredictable. It follows the path of least resistance, which means the entry point and the visible damage are often in completely different locations. For complex cases, advanced caulking tips can help you think through the full drainage path before drawing conclusions.
What causes window caulking to fail?
Understanding why caulking fails helps you make better decisions about materials, timing, and maintenance. In the GTA, a few specific factors are especially relevant.
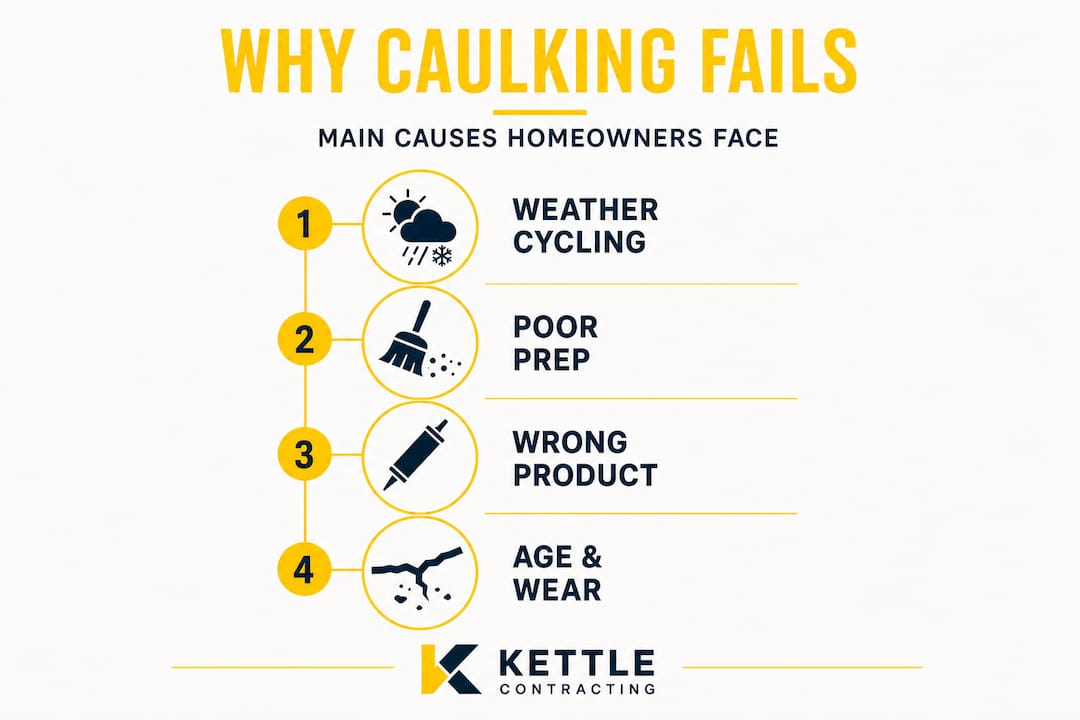
Cold weather and thermal cycling
Toronto winters are hard on caulking. Caulking can fail when it becomes brittle in cold weather, is applied incorrectly or beyond its useful life, or when poor surface preparation means it cannot maintain a watertight seal. The repeated expansion and contraction of frames and walls through freeze-thaw cycles puts constant stress on the sealant.
Poor surface preparation
Caulk applied over dirty, wet, or oily surfaces will not bond properly. Even a small amount of dust or old caulk residue can prevent full adhesion, leading to early failure. This is one of the most preventable causes of caulking problems.
Using the wrong product
Not all caulks are suitable for exterior use or for the specific materials around your windows. Using an interior-grade product outdoors, or a product that lacks UV resistance, will dramatically shorten its lifespan. Choosing durable caulk that is rated for your specific application and climate conditions makes a measurable difference in how long the seal lasts.
Age and natural wear
Even a perfectly applied, high-quality caulk has a finite lifespan. Most exterior caulking products last between five and ten years under normal conditions. In harsh climates, that window can be shorter.
Key causes of caulking failure at a glance:
- Freezing temperatures causing brittleness and cracking
- Thermal expansion and contraction over repeated seasons
- Inadequate surface cleaning and preparation before application
- Wrong product type for the substrate or climate
- Application in temperatures that are too cold or too hot
- Age and natural degradation beyond the product’s useful life
Pro Tip: Always check the weather forecast before applying exterior caulk. Most products require temperatures to stay above 5°C during application and for at least 24 hours after. Applying caulk in near-freezing conditions reduces adhesion and shortens the seal’s life significantly.
Our take: how to think like a pro when identifying window caulking issues
Most homeowners only look at their window caulking when something has already gone wrong. A draft appears, a stain shows up, or a contractor points it out during another job. That reactive approach is understandable, but it consistently leads to higher repair costs and more damage than necessary.
What separates a proactive property owner from a reactive one is not expertise. It is habit. Taking ten minutes twice a year to walk your property and check your window seals, with your phone in hand to photograph anything suspicious, gives you a running record of how your building is ageing. That record is genuinely useful when you need to decide whether a repair is urgent or can wait.
We also see a lot of misdiagnosis in the field. Homeowners focus on where the water appears rather than where it enters. They seal over weep holes thinking they are fixing a gap. They replace caulk without cleaning the substrate first, and the new bead fails within a season. The common caulking mistakes that lead to these outcomes are almost always avoidable with a bit of upfront knowledge.
The real secret to dry, energy-efficient windows in Toronto’s climate is not a single repair. It is a consistent inspection habit combined with the right materials and proper technique. When you approach your windows the way a professional does, thinking about drainage paths, substrate condition, and seasonal timing, you catch problems early and spend far less over the long run.
Next steps to safeguard your home’s windows
If your inspection has turned up signs of failed caulking, the next step is getting the repair done correctly. Rushing in with a new bead of caulk over a failed one rarely solves the problem and often makes it worse. Proper preparation is everything, and the guide on preparing for caulking walks you through exactly what needs to happen before any sealant goes on.

For those dealing with more complex issues, such as recurring failures or water that keeps finding its way in despite fresh caulking, the resource on fixing caulk issues covers the most common problems and their real solutions. And if you want to understand why some caulking jobs last a decade while others fail in a single winter, the guide on long-lasting caulking science breaks down the material and application factors that determine durability. At Kettle Contracting, we work with GTA homeowners and property managers who want reliable, lasting results. If you would like professional support, we are here to help.
Frequently asked questions
How often should I inspect my window caulking?
Check window caulking at least twice a year, once in spring and once in fall, to catch early signs of failure before extreme weather arrives. Periodic inspections at the start of warm and cool weather are the standard recommendation for maintaining a reliable seal.
Should I caulk over window weep holes?
No, never caulk over weep holes. Blocking weep drainage openings can worsen water problems by trapping moisture inside the window frame rather than allowing it to drain out.
What is the difference between perimeter caulking failure and glass unit seal failure?
Perimeter caulking failure causes leaks and drafts around the window frame, while an insulated glass unit seal failure causes foggy or condensed glass between the panes. They require different repairs and should not be confused with each other.
Can cold weather cause caulking to fail faster?
Yes. Cold weather makes caulking brittle, which leads to cracking and loss of flexibility, especially through repeated freeze-thaw cycles common in the GTA.
How can I tell if interior water stains are from window caulking failure?
Water stains alone are not a reliable indicator of where the leak originates. Interior staining is rarely reliable for pinpointing the entry point, so always inspect the exterior caulking and look for visible gaps or cracks to trace the actual source.
Recommended
- How to Tell If Your Window Caulking Is Failing | Expert Advice from the Pros – Kettle Contracting
- Preparing Your Windows for Caulking: A Comprehensive Guide – Kettle Contracting
- Achieving the Perfect Seal: Addressing Common Window Caulking Mistakes – Kettle Contracting
- The Biggest Mistakes People Make When Caulking Windows – Kettle Contracting